00:06 We recently launched the early access version of our new book, App
Architecture. Today, we'll add a
new feature to the example app from the book.
00:24 The app lets us record and play back voice memos. The recordings
are saved in a folder structure, which we can freely organize by creating new
folders and subfolders. When we select a recording, it opens in a simple player.
00:58 In the book, we wrote out a simple voice notes app in various
architectural patterns, but adding a feature might work differently in each
architecture. Today, we're working with the MVC version — the most commonly used
architecture in Cocoa — and we'll see what we need to do in order to implement
some changes.
01:20 Currently, a selected recording is played by pushing a new play
view controller. When we exit this view controller, playback is stopped. It
would be nice to add a mini player at the bottom of the screen that keeps
playing the selected recording while we browse the folders.
Updating the Storyboard
01:53 The storyboard shows us the overall structure of the app. There's
a split view controller at the root, its master is the folder view controller
hierarchy, and the detail view controller is the player:
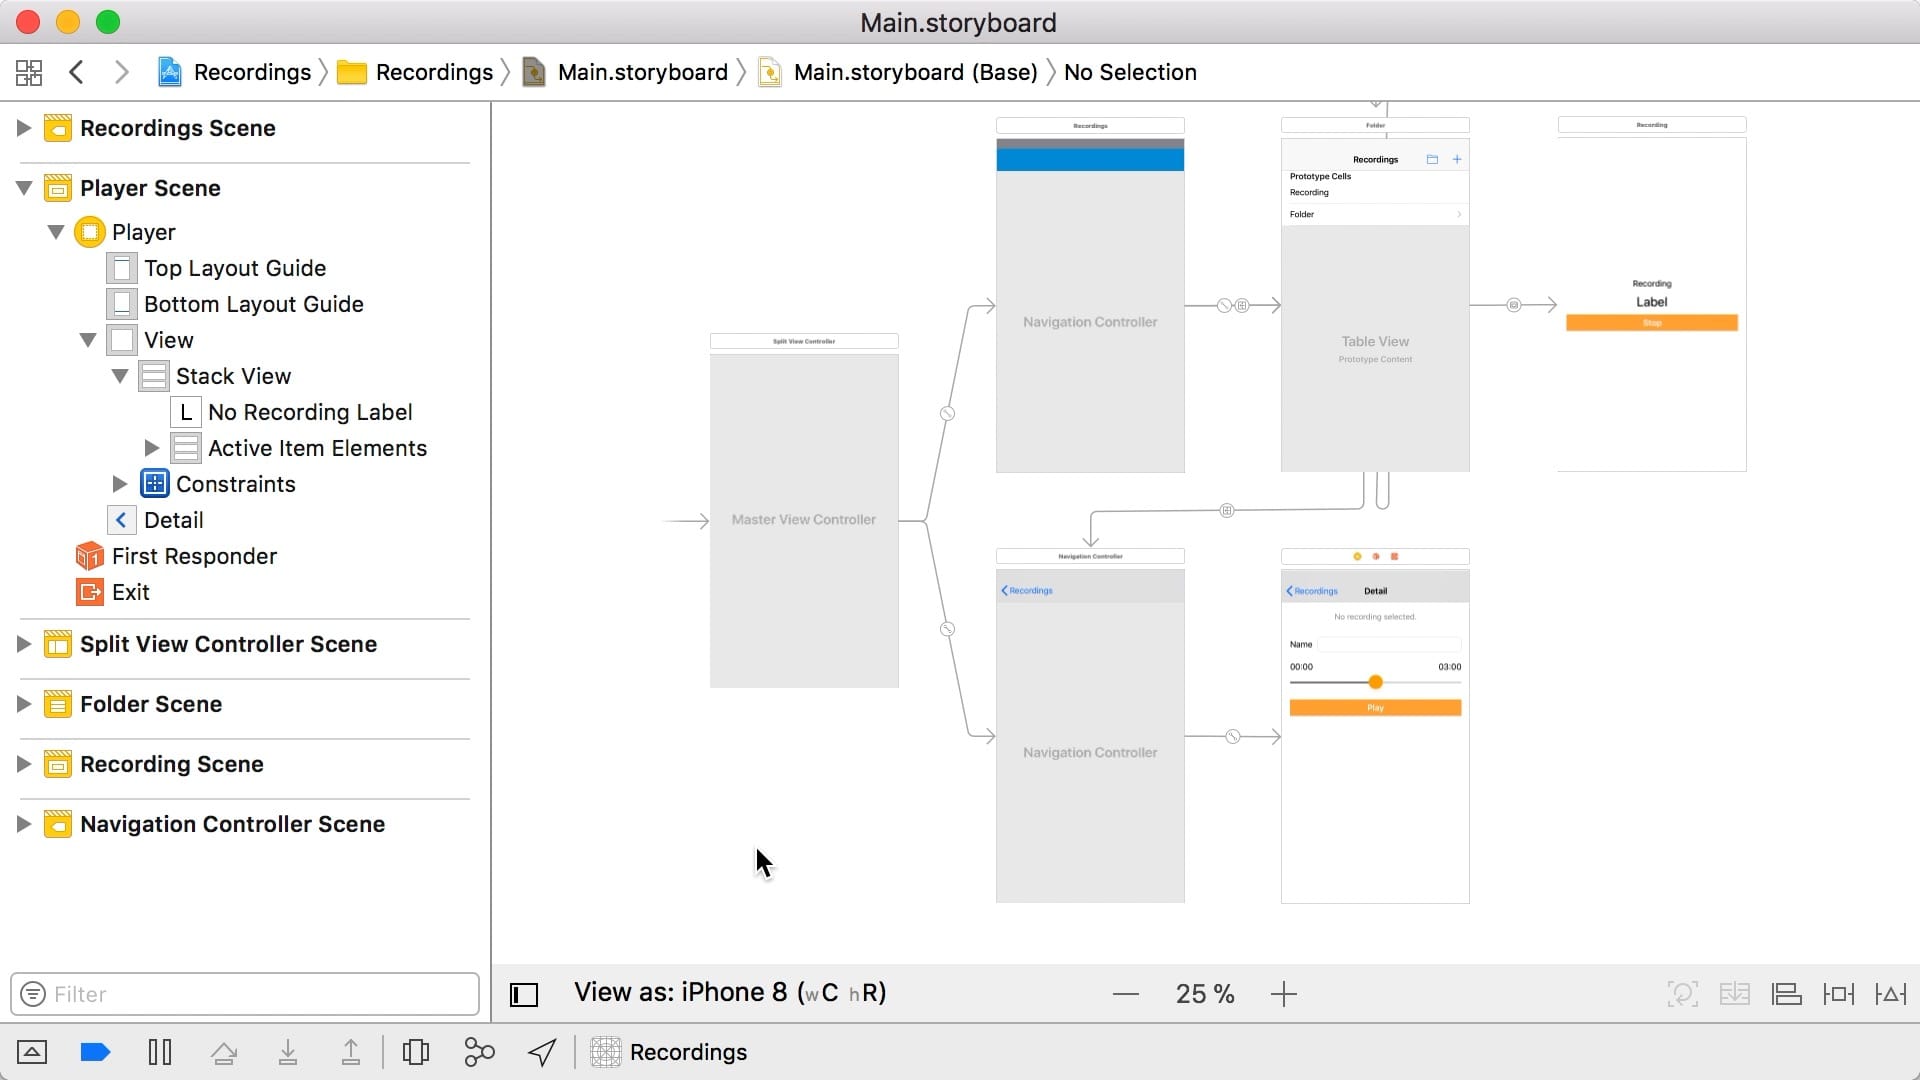
02:21 For the new version, we want to wrap this entire split view
controller in a new container, which will be displayed at the top of the screen.
At the bottom, we'll have another container holding the mini player. As a first
step before updating our code, we're going to draw out these changes in the
storyboard.
02:54 We add a new view controller with two container views: a large one
on top, and a smaller one for the mini player at the bottom. Using layout
constraints, we pin the container views to the superview's edges, we add a
vertical constraint between the two, and we give the player's container a fixed
height.
04:22 We mark the new view controller as the initial controller, and we
pick the split view controller as content for the large container view. When we
try to run this, we get a crash because the app delegate still expects the root
view controller to be a split view controller:
func application(_ application: UIApplication, didFinishLaunchingWithOptions launchOptions: [UIApplicationLaunchOptionsKey: Any]?) -> Bool {
    let splitViewController = window!.rootViewController as! UISplitViewController
    splitViewController.delegate = self
    splitViewController.preferredDisplayMode = .allVisible
    return true
}
05:25 This is an easy fix: we add a new view controller subclass to our
app and move the code that configures the split view controller into it. Because
we embedded the split view controller in the container view, we can pick it from
the childViewControllers property:
import UIKit

class PlayViewContainerViewController: UIViewController {
    override func viewDidLoad() {
        super.viewDidLoad()

        let splitViewController = childViewControllers[0] as! UISplitViewController
        splitViewController.delegate = self
        splitViewController.preferredDisplayMode = .allVisible
    }
}
06:51 We also move the conformance to UISplitViewControllerDelegate,
and we move the used delegate method into our new view controller:
import UIKit
class PlayViewContainerViewController: UIViewController, UISplitViewControllerDelegate {
override func viewDidLoad() {}
func splitViewController(_ splitViewController: UISplitViewController, collapseSecondary secondaryViewController: UIViewController, onto primaryViewController: UIViewController) -> Bool {}
}
06:57 We update the type of the root view controller in our storyboard,
run the app, and see that everything works the same way as before, with the
addition of a blank space where the mini player will go.
07:31 As a side note, we should mention that the sample app also
supports iPad — hence the use of a split view controller. We are ignoring this
fact in today's episode and instead focusing on the layout on iPhone.
Embedding the Player
07:50 The next step is to present the play view controller modally
instead of pushing it onto the navigation stack. Back in the storyboard, the
player is opened via a segue. We change this segue's kind from "Show Detail" to
"Present Modally." This makes the player show up from the bottom of the screen.
08:37 We need a second player to go into the empty spot of our root view
controller. We duplicate the play view controller in the storyboard, removing
some of the subviews not needed for the mini player, like the text field and the
label for the name of the selected recording.
10:46 Running the app, we now see the mini player embedded at the bottom
of the screen, even though it doesn't yet do anything:
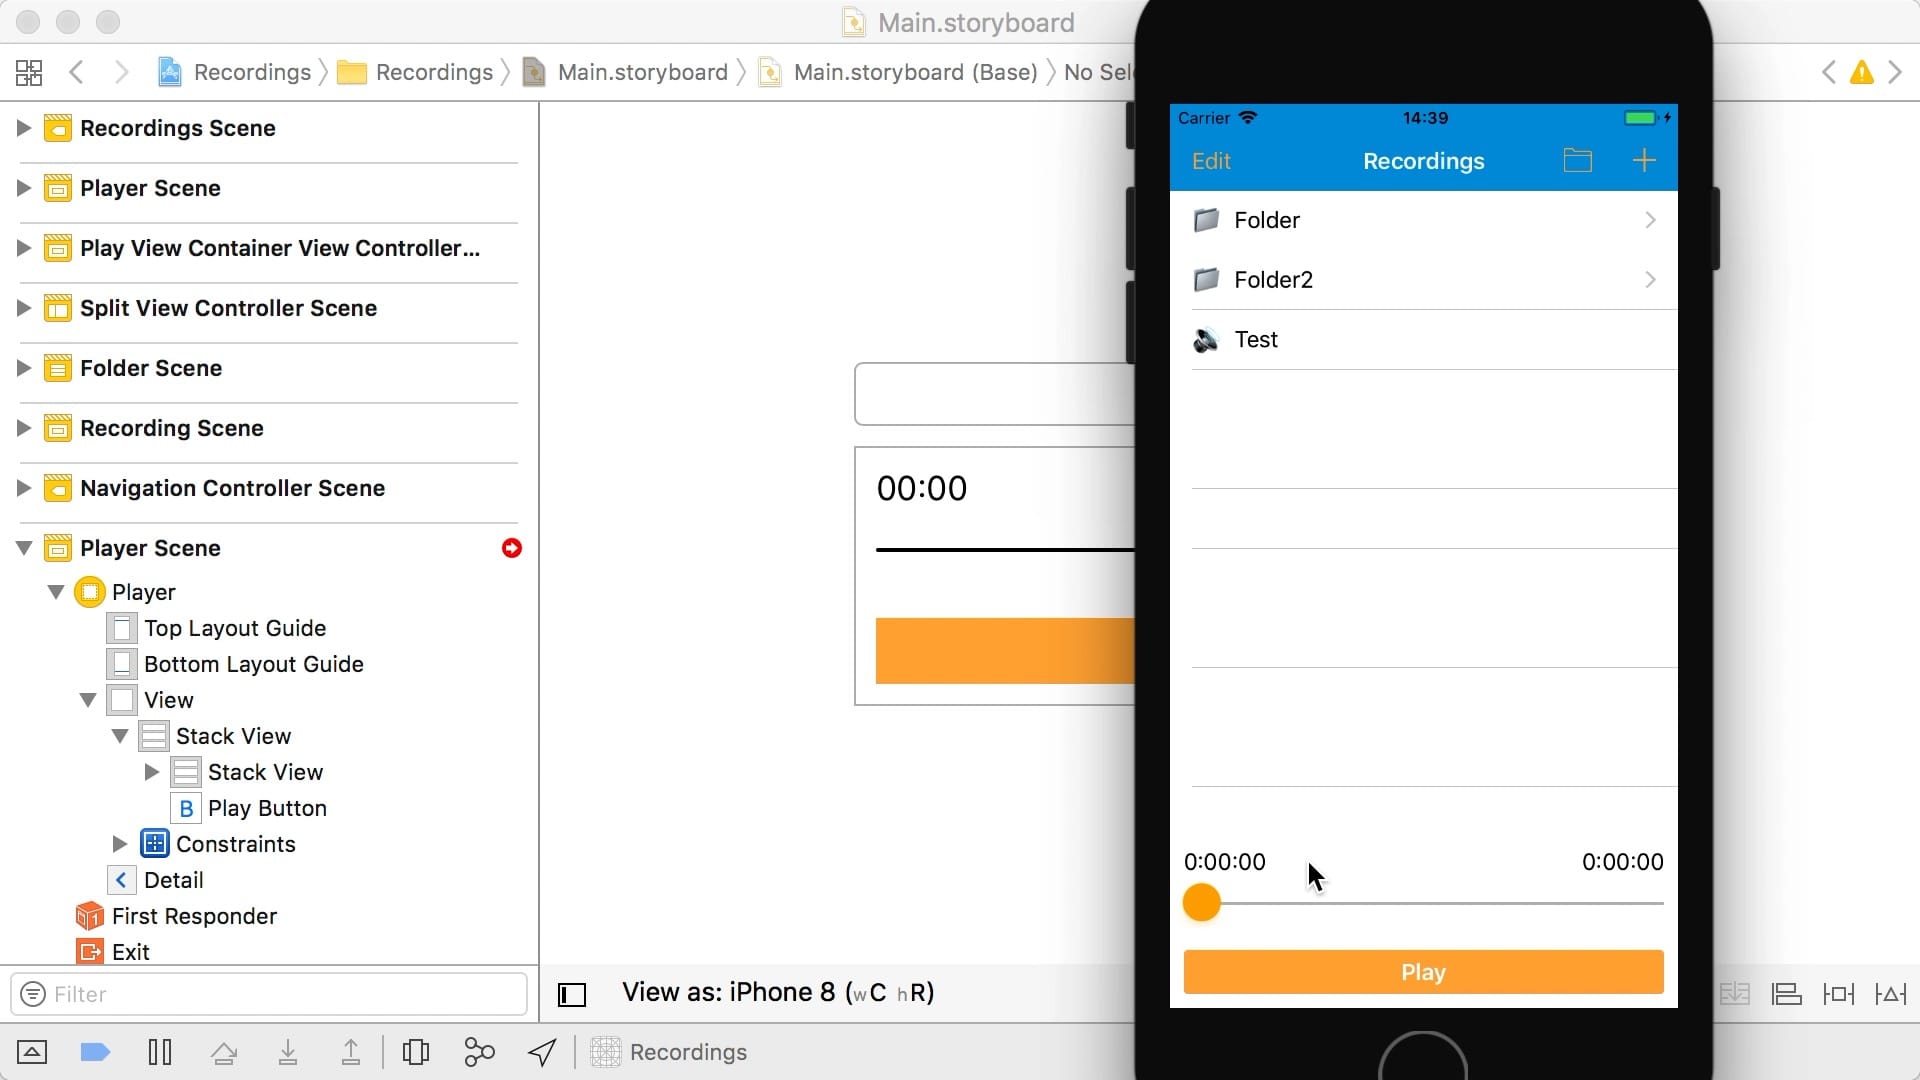
11:00 When we select a recording, we notice we're missing a button to
dismiss the modal view controller. We have to add a bar button and use an unwind
segue to go back to the folder view controller:
class FolderViewController: UIViewController {
@IBAction func unwindToFolderViewController(segue: UIStoryboardSegue) {
}
}
12:33 Now we can open a recording and tap "Done" to close it again.
Making the Mini Player Work
12:40 With these changes in place, we've constructed the new layout of
our app and we're ready to update our code and make the mini player actually
work. To figure out what needs to be done, we take a more detailed look at the
MVC architecture of the app and how the player is currently implemented.
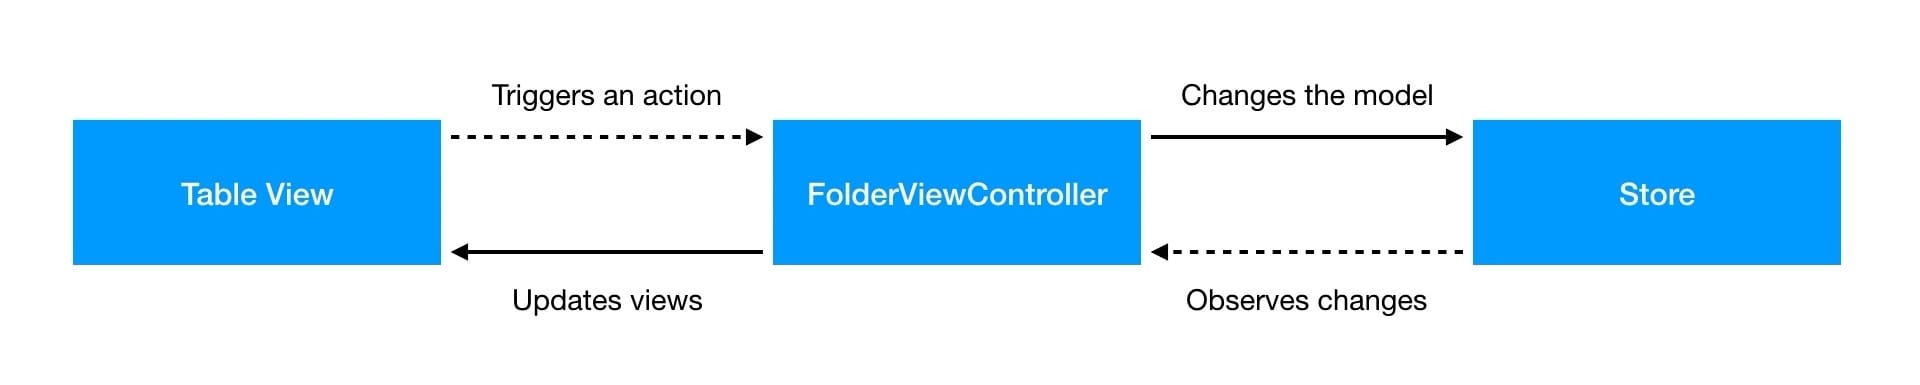
13:11 The diagram below shows how MVC generally works. The building
blocks are a view, a controller, and a model. The view sends events, like
touches or selections, to the controller. The controller can change the model
and observe the model's changes in order to update the view. Ideally, all event
loops follow exactly this pattern:

13:47 Let's consider a practical example from our app. When the user
deletes a folder in the table view, an action is called on the folder view
controller. The view controller then actually removes the folder from the model
(in this case, a global object called Store). The folder view controller is
then notified of this change to the store, and it updates the table view. This
is exactly in line with the MVC diagram from above:
14:23 However, our app has multiple folder view controllers to support
the nested folders. This means our architecture actually looks like this:
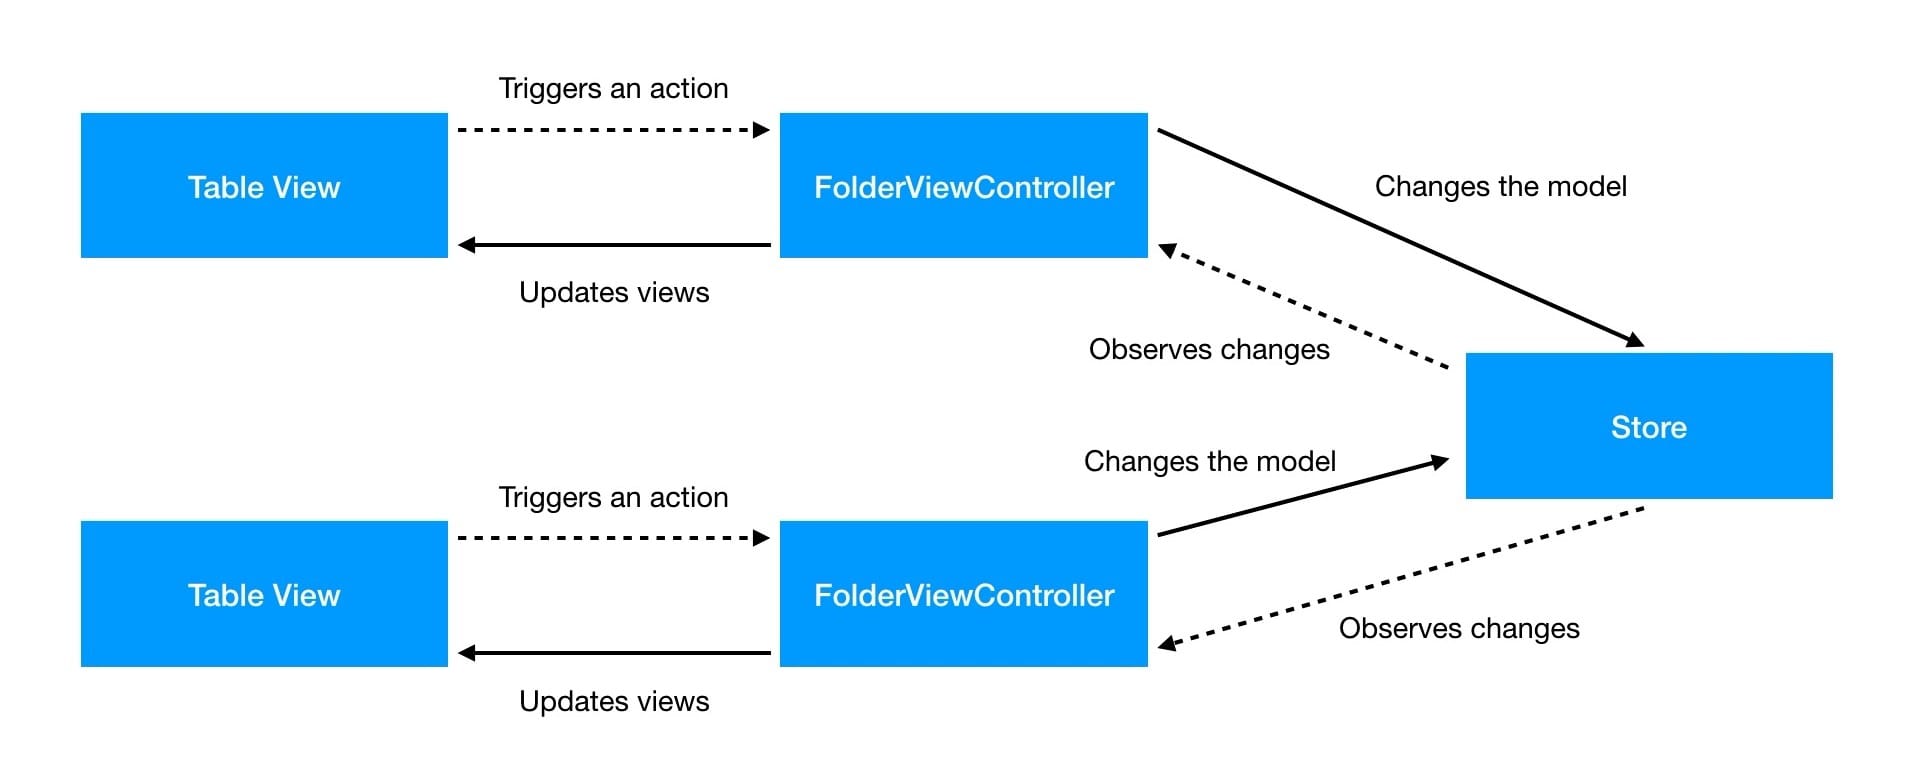
14:31 All folder view controllers talk to the same Store instance,
which is a singleton. This way, the view controllers can indirectly communicate
with each other through the model layer. So, for example, when we delete a
folder in one folder view controller, the change can be picked up by all the
other folder view controllers as well.
15:26 The PlayViewController should follow a similar pattern, with a
Player as its model. But when we duplicated the view controller in the
storyboard, we ended up with this situation:
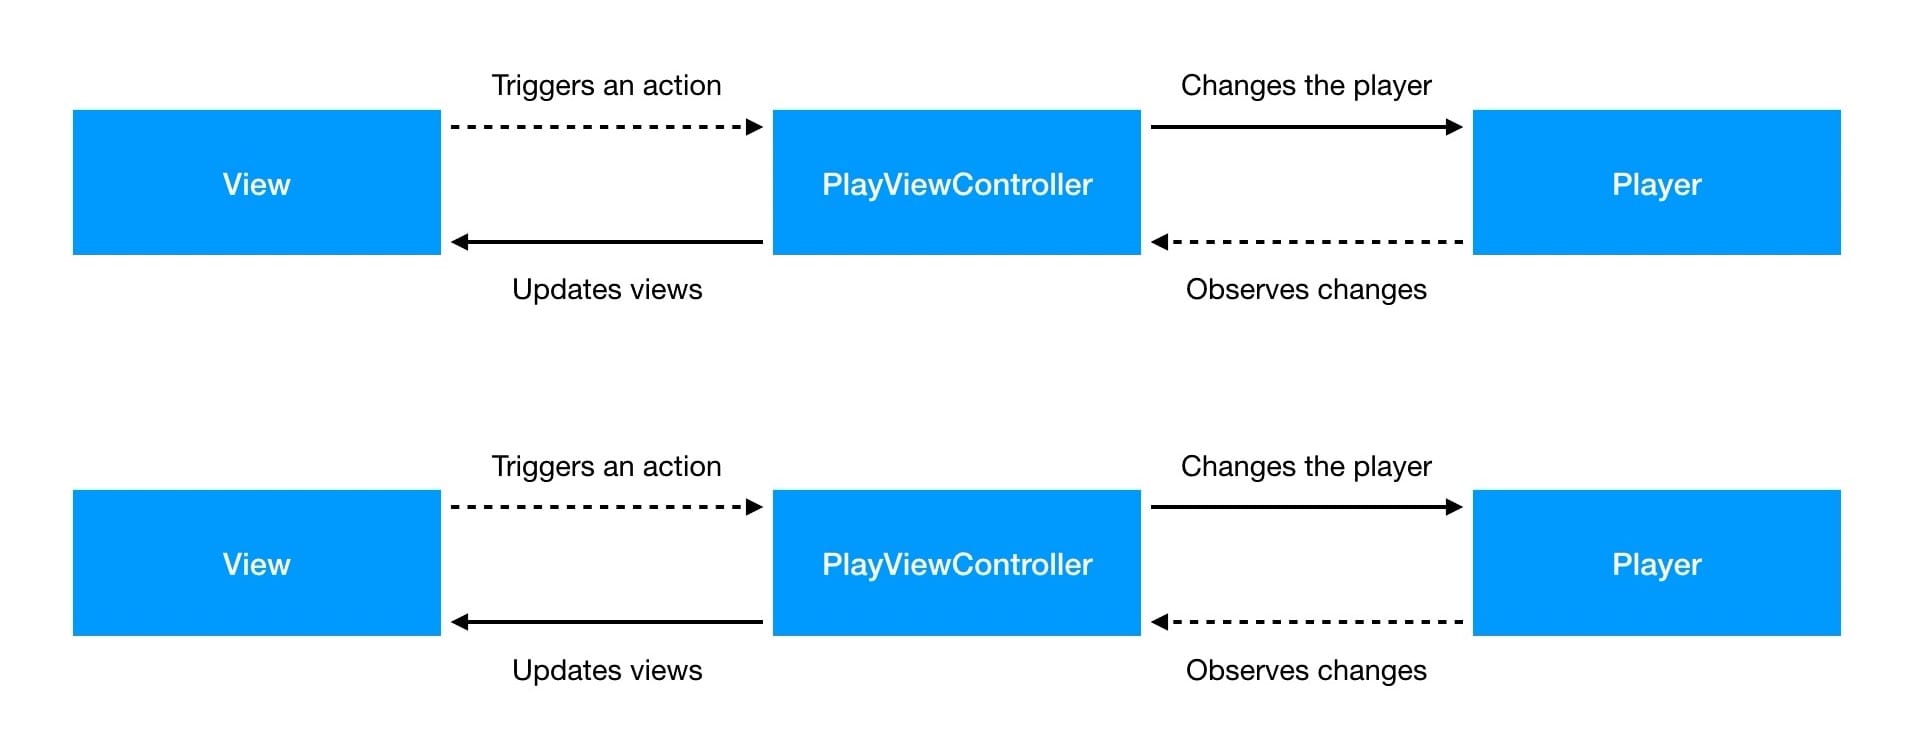
15:48 The play view controller currently owns its player, which means we
get a new player with each play view controller. Because we don't want to
manually sync multiple players, we should change the structure of our app so
that there's only one player. With a single shared player, we have a mechanism
through which play view controllers communicate with each other — not directly,
but via the same player instance:
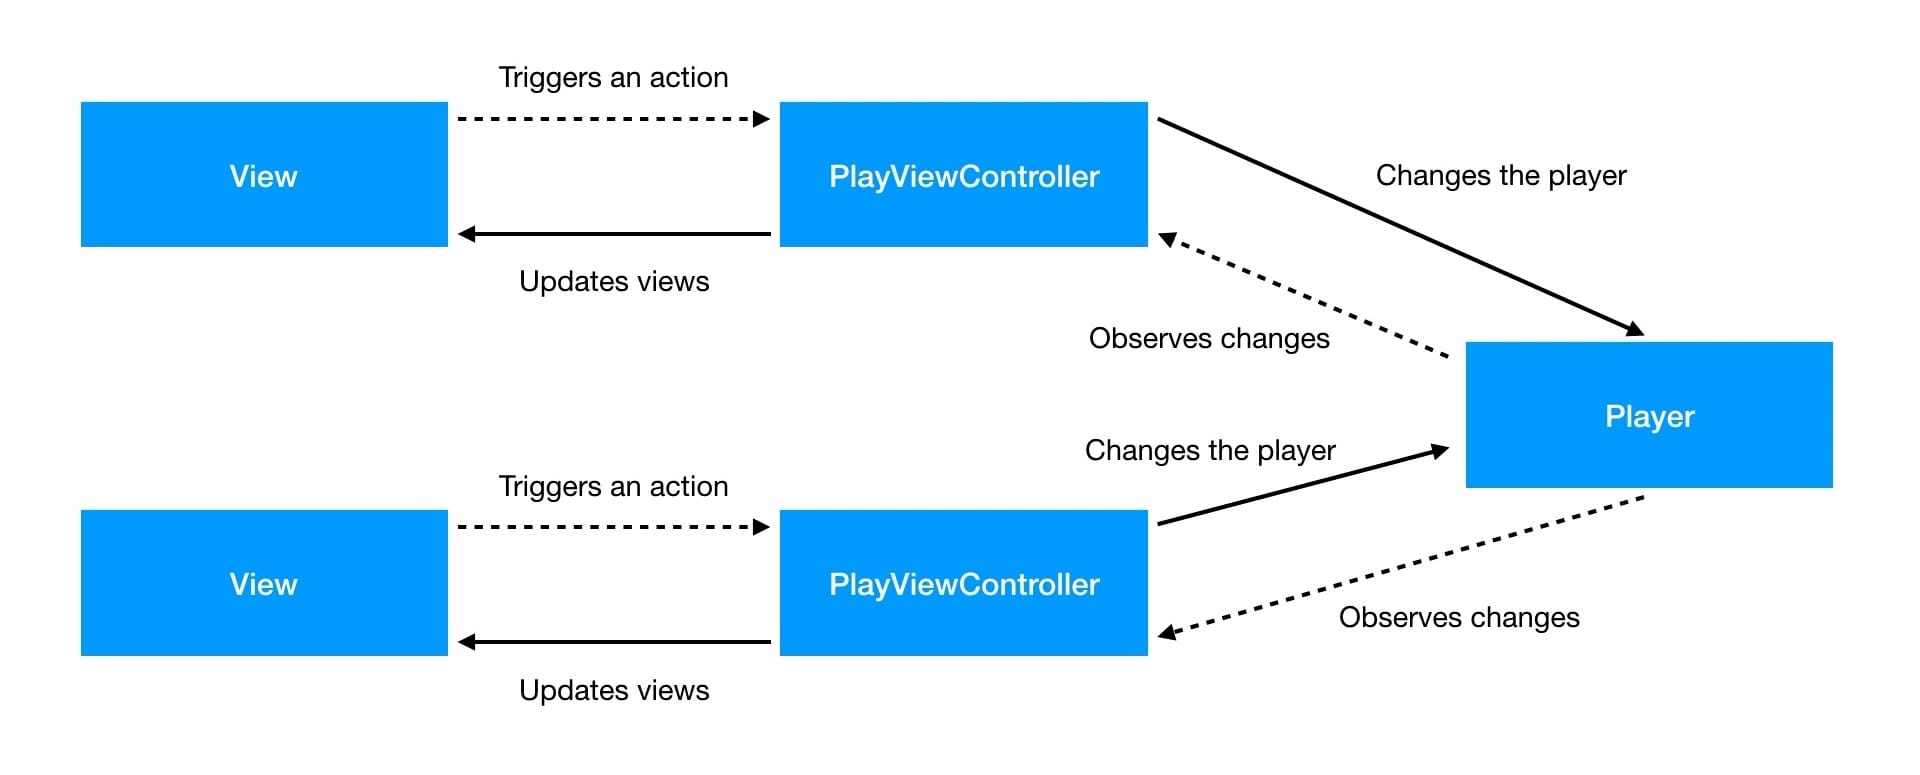
This way, if we scrub through the timeline on the modal player, then the mini
play view controller knows to update its views too, since it's observing the
same player.
Planning the Updates
16:55 There's a bit of work ahead of us to make a single, shared
player. We'll need to extract the player code and create a shared instance
somewhere. When a play view controller appears, we need to populate it with the
player's current information. And the view controller needs to observe the
player in order to stay in sync.
17:22 Quickly glancing over the PlayViewController source, we see
that the code dealing with the player and the UI is all entangled. The UI code
has to stay in the view controller, but all player logic should be extracted and
moved into the model layer of our app; the shared player shouldn't know anything
about UI.
18:38 How exactly we make the described changes is dictated by the
app's architecture. In the book App
Architecture, we look at how this
app's implementation is very different in various architectures like Elm and
MVVM-C. In next week's episode, we'll continue to look at the MVC
implementation.
