00:06 We're going to look at building a form today. This will be the first
part of a new series, and in upcoming episodes, we'll tease out a library step
by step. In particular, there will be a lot of refactoring to make our code
better and more reusable.
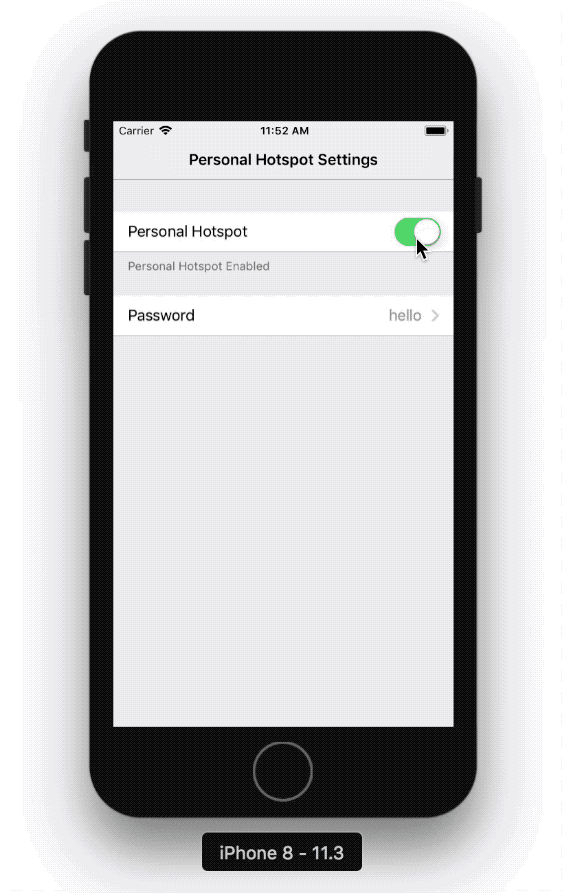
00:29 Although the form we're building is very simple, it has some
interesting elements. It looks a lot like the Settings app of iOS and models a
fake personal hotspot. The first section contains a toggle switch to enable and
disable the hotspot. When we toggle this switch, it changes the section's
footer. The second section shows a password field. When we tap it, another table
view opens, and we can edit the password.
01:05 Initially, we'll build this small form in a very naive manner,
which will prove to be a bit of work. Later, after we've abstracted out the
library, it'll be super easy to add or change form elements.
Adding the Toggle Section
01:30 We've prepared a simple table view controller, so now we can add
the first section by implementing some data source methods. At first, we pretend
there's just one section and one row:
override func numberOfSections(in tableView: UITableView) -> Int {
    return 1
}

override func tableView(_ tableView: UITableView, numberOfRowsInSection section: Int) -> Int {
    return 1
}
02:10 We're only using static cells, so we won't concern ourselves with
things like reuse identifiers. The first cell we return is a standard table view
cell with some label text and a toggle added to it, the latter of which is
aligned to the cell's trailing anchor:
override func tableView(_ tableView: UITableView, cellForRowAt indexPath: IndexPath) -> UITableViewCell {
    let cell = UITableViewCell(style: .value1, reuseIdentifier: nil)
    cell.textLabel?.text = "Personal Hotspot"
    let toggle = UISwitch()
    cell.contentView.addSubview(toggle)
    toggle.translatesAutoresizingMaskIntoConstraints = false
    cell.contentView.addConstraints([
        toggle.centerYAnchor.constraint(equalTo: cell.contentView.centerYAnchor),
        toggle.trailingAnchor.constraint(equalTo: cell.contentView.layoutMarginsGuide.trailingAnchor)
        ])
    return cell
}
03:26 The toggle's target action will be a method on the view controller
that needs access to the toggle in order to read its current state, so we turn
the toggle into a property of the view controller:
let toggle = UISwitch()
override func tableView(_ tableView: UITableView, cellForRowAt indexPath: IndexPath) -> UITableViewCell {
toggle.addTarget(self, action: #selector(toggleChanged(_:)), for: .valueChanged)
cell.contentView.addSubview(toggle)
return cell
}
@objc func toggleChanged(_ sender: Any) {
}
04:31 The toggleChanged method needs to store the toggle's state
somewhere, so we create a state struct, Hotspot. We immediately add the other
property we need, the password string, and we provide default values for both
properties. Whenever the state changes in the view controller, we print it to
the console:
struct Hotspot {
var isEnabled: Bool = true
var password: String = "hello"
}
class ViewController: UITableViewController {
var state = Hotspot() {
didSet {
print(state)
}
}
@objc func toggleChanged(_ sender: Any) {
state.isEnabled = toggle.isOn
}
}
06:35 Now that the view controller has a default state, we have to make
sure the toggle's initial state matches up with it:
override func tableView(_ tableView: UITableView, cellForRowAt indexPath: IndexPath) -> UITableViewCell {
toggle.isOn = state.isEnabled
}
Adding the Password Section
07:27 We move on to adding the second section, which contains the
password field, to our table. We use a standard cell with a title on the left
and the password value on the right. Later, when we tap the cell, we want to
push a second view controller to enter or edit the password.
08:05 We update the data source methods to add the second section:
override func numberOfSections(in tableView: UITableView) -> Int {
return 2
}
override func tableView(_ tableView: UITableView, cellForRowAt indexPath: IndexPath) -> UITableViewCell {
let cell = UITableViewCell(style: .value1, reuseIdentifier: nil)
if indexPath.section == 0 {
} else if indexPath.section == 1 {
cell.textLabel?.text = "Password"
cell.detailTextLabel?.text = state.password
cell.accessoryType = .disclosureIndicator
} else {
fatalError()
}
return cell
}
09:17 That's all we have to do to add a second static cell, but we can
already tell that our approach won't scale well. With more and more rows and
sections, this kind of code is going to get messy very quickly.
09:40 With every cell we add, or when we move cells around, we have to
check the code that references specific index paths. This becomes even clearer
when we add more details, like preventing the toggle cell from being highlighted
when tapped:
override func tableView(_ tableView: UITableView, shouldHighlightRowAt indexPath: IndexPath) -> Bool {
    return indexPath.section != 0
}
10:46 Just like in the real Settings app, we also want to use section
footers in some cases — for example, to help the user understand the effects of
changing a value:
override func tableView(_ tableView: UITableView, titleForFooterInSection section: Int) -> String? {
    if section == 0 {
        return state.isEnabled ? "Personal Hotspot Enabled" : nil
    }
    return nil
}
12:09 This adds a footer to the toggle section when the toggle is
enabled. But the footer isn't updated when we tap to disable the toggle — we
have to manually update the section footer when our state changes. To update, we
can't simply reload the entire section, because the user could be in the middle
of editing something else and would lose their unsaved changes. So we have to
resort to a bit of a hack and update the footer view directly:
var state = Hotspot() {
    didSet {
        print(state)
        tableView.beginUpdates()
        let footer = tableView.footerView(forSection: 0)
        footer?.textLabel?.text = tableView(tableView, titleForFooterInSection: 0)
        footer?.setNeedsLayout()
        tableView.endUpdates()
    }
}
13:33 This works, but the animation of the footer appearing and
disappearing looks a bit weird, so we decide to disable animations during the
update:
var state = Hotspot() {
    didSet {
        print(state)
        UIView.setAnimationsEnabled(false)
        tableView.beginUpdates()
        let footer = tableView.footerView(forSection: 0)
        footer?.textLabel?.text = tableView(tableView, titleForFooterInSection: 0)
        footer?.setNeedsLayout()
        tableView.endUpdates()
        UIView.setAnimationsEnabled(true)
    }
}
13:50 While we're in the state's didSet, the value of the password
might have changed as well. We also apply that change, in order to keep our
model and views in sync:
var state = Hotspot() {
didSet {
let cell = tableView.cellForRow(at: IndexPath(row: 0, section: 1))
cell?.detailTextLabel?.text = state.password
}
}
14:31 We could tell the table view to reload the password row instead of
updating the cell's label, but that's just another way of hardcoding the update.
14:43 This completes the toggle section. All we need now is a way to
edit the password. We're following the Settings app's example, where the actual
text field is presented on a separate screen.
Editing the Password
15:01 So, to edit the password, we're going to push a new table view
controller onto the navigation stack, and it looks a lot like the first view
controller:
class PasswordViewController: UITableViewController {
    let textField = UITextField()
    init(password: String) {
        super.init(style: .grouped)
        textField.text = password
    }

    required init?(coder aDecoder: NSCoder) {
        fatalError("init(coder:) has not been implemented")
    }

    override func viewDidLoad() {
        super.viewDidLoad()
        navigationItem.title = "Hotspot Password"
    }

    override func tableView(_ tableView: UITableView, numberOfRowsInSection section: Int) -> Int {
        return 1
    }

    override func tableView(_ tableView: UITableView, cellForRowAt indexPath: IndexPath) -> UITableViewCell {
        let cell = UITableViewCell(style: .value1, reuseIdentifier: nil)
        cell.textLabel?.text = "Password"
        cell.contentView.addSubview(textField)
        textField.translatesAutoresizingMaskIntoConstraints = false
        cell.contentView.addConstraints([
            textField.centerYAnchor.constraint(equalTo: cell.contentView.centerYAnchor),
            textField.trailingAnchor.constraint(equalTo: cell.contentView.layoutMarginsGuide.trailingAnchor),
            textField.leadingAnchor.constraint(equalTo: cell.textLabel!.trailingAnchor, constant: 20)
        ])
        return cell
    }
}
17:26 We push a new PasswordViewController when the user selects the
password cell:
class ViewController: UITableViewController {
override func tableView(_ tableView: UITableView, didSelectRowAt indexPath: IndexPath) {
if indexPath.section == 1 {
let passwordVC = PasswordViewController(password: state.password)
navigationController?.pushViewController(passwordVC, animated: true)
}
}
}
18:16 When the new view controller appears, the password text field
should become the first responder in order to bring up the keyboard:
class PasswordViewController: UITableViewController {
override func viewDidAppear(_ animated: Bool) {
super.viewDidAppear(animated)
textField.becomeFirstResponder()
}
}
19:20 Finally, we need a way to communicate changes to the text field
back to the original view controller. We can do so by using a delegate, but
since the editing of the password is so lightweight, and since we're already
using a custom initializer, we choose to use a callback:
class PasswordViewController: UITableViewController {
let textField = UITextField()
let onChange: (String) -> ()
init(password: String, onChange: @escaping (String) -> ()) {
self.onChange = onChange
super.init(style: .grouped)
textField.text = password
}
}
19:54 We call the callback in two cases: when the text field editing
ends, and when the user hits the return key. In the latter case, we also pop the
view controller, copying the Settings app's behavior:
class PasswordViewController: UITableViewController {
override func tableView(_ tableView: UITableView, cellForRowAt indexPath: IndexPath) -> UITableViewCell {
textField.addTarget(self, action: #selector(editingEnded(_:)), for: .editingDidEnd)
textField.addTarget(self, action: #selector(editingDidEnter(_:)), for: .editingDidEndOnExit)
return cell
}
@objc func editingEnded(_ sender: Any) {
onChange(textField.text ?? "")
}
@objc func editingDidEnter(_ sender: Any) {
onChange(textField.text ?? "")
navigationController?.popViewController(animated: true)
}
}
21:32 From the root view controller, we pass in a callback that updates
our state with the new password:
class ViewController: UITableViewController {
override func tableView(_ tableView: UITableView, didSelectRowAt indexPath: IndexPath) {
if indexPath.section == 1 {
let passwordVC = PasswordViewController(password: state.password) { [unowned self] in
self.state.password = $0
}
navigationController?.pushViewController(passwordVC, animated: true)
}
}
}
22:09 We run the app and see that everything works as expected. The
code wasn't hard to write, but it's quite tricky to maintain; if we, for
example, want to add or insert a new row, then we basically have to go through
all the code and tweak it in many different spots. This means there's a lot that
can go wrong.
Library Design Goals
23:16 The following is a snippet of the code we'll end up writing in
this series. Here, we construct the same form as today:
struct Hotspot {
    var enabled: Bool = false
    var password: String = "sample"

    var hotspotFooter: String? {
        return enabled ? "Personal Hotspot Enabled" : nil
    }
}

let hotspotForm: Form<Hotspot> = form(sections: [
    section(footer: \.hotspotFooter, cells: [
        controlCell(title: "Personal Hotspot", control: uiSwitch(bind: \.enabled), leftAligned: false)
    ]),
    section(cells: [
        nestedTextField(title: "Password", bind: \.password),
    ])
])
23:28 This code looks much more declarative; we simply describe the
elements we need. By using key paths, we have full control over the bindings
that keep the form elements and the underlying struct in sync.
24:00 The main design goal of the forms library we're building is not
having to worry about our views and model getting out of sync, so we want to
have a single struct that represents the form as it is visible to the user. This
makes it super easy to, for example, serialize the struct to UserDefaults. And
by abstracting away the table view elements, the library should make it
effortless for us to update the form by adding more fields, moving fields
around, or even nesting multiple forms.
24:43 We think it'll be a lot of fun to take today's code and refactor
it step by step until we end up with a useful library.
