
4 Episodes · 1h53min
- Playground QuickLook for Binary Trees 27:58
- Red-Black Trees 31:51
- Binary Search Trees 27:00
- Sorted Arrays with Binary Search 26:51
Swift Talk # 65
Subscribers get exclusive access to new and all previous subscriber-only episodes, video downloads, and 30% discount for team members. Become a Subscriber →
We create a custom Quick Look extension to visualize binary tree structures in playgrounds.
00:06 In episode #58, together with Károly, we implemented red-black trees just as they're done in his book Optimizing Collections. To visualize the trees, we rendered them in the playground. Today we'll take a closer look at how we did this by implementing Quick Look for binary trees.
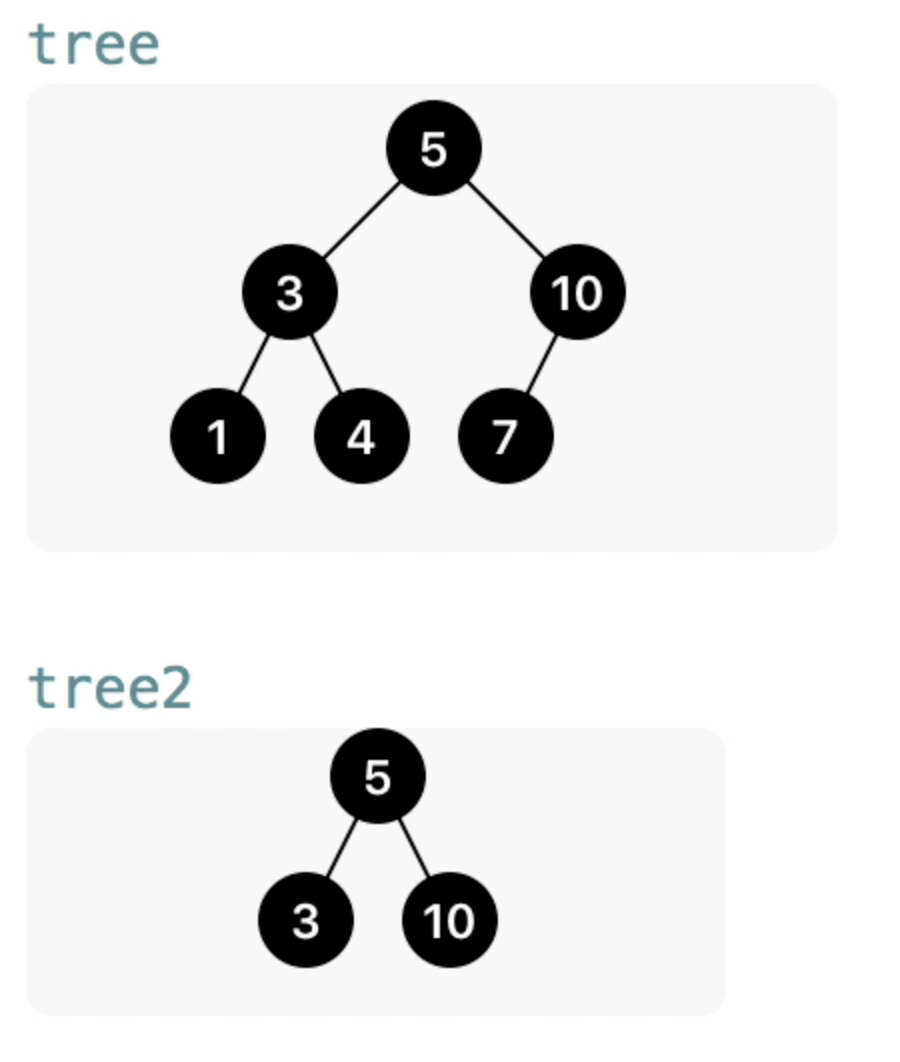
00:40 We look at two example trees: one with three levels, and another one with two levels. We'll use the number of levels — the height of the tree — to figure out the bounds of the image we want to draw. On the bottom row, we can draw all nodes next to each other. One level up, there's more spacing between the nodes such that they're each centered above their two children, and so on and so forth. This means that the horizontal spacing between nodes is a function of the height:
02:17 The first step in creating an image from a tree is to compute the height of the tree. Then we can use this height to determine the horizontal positioning of nodes as we work our way down the tree.
02:48 We'll extend the BinaryTree implementation from episode
#56 to render an
image. We compute the height of the tree by recursively going down all its
paths, and we switch over the tree enum and return zero for empty nodes. For
non-empty nodes, we return the height of the longest subtree, incremented by
one:
extension BinaryTree {
    var maxHeight: Int {
        switch self {
        case .empty: return 0
        case let .node(_, left, right):
            return max(left.maxHeight, right.maxHeight) + 1
        }
    }
}
05:07 From this height, we can compute the bounds of the entire image. The height of the tree — sometimes referred to as the depth — gives us the maximum number of nodes on the bottom row. Because each node can have two children, the maximum number of nodes at the bottom of a tree equals two to the power of the depth of the tree.
06:04 We add a bounds property, which is a CGRect. The width is the
maximum number of nodes at the bottom, multiplied by a constant node size (later
we'll add some spacing between nodes):
let nodeSize = CGSize(width: 24, height: 24)

extension BinaryTree {
    // ...
    var bounds: CGRect {
        let width = pow(2, CGFloat(maxHeight)-1) * nodeSize.width
        let height = CGFloat(maxHeight) * nodeSize.height
        return CGRect(origin: .zero, size: CGSize(width: width, height: height))
    }
}
08:03 Next, we can start writing the render method using the bounds
and UIGraphicsImageRenderer. We write a helper method that, given the center
CGPoint of a node and the current level, draws that node into the context of
the renderer:
func render(into context: CGContext, at center: CGPoint, currentHeight: Int) {
    // TODO
}

func render() -> UIImage {
    let center = CGPoint(x: bounds.midX, y: nodeSize.height/2)
    return UIGraphicsImageRenderer(bounds: bounds).image() { context in
        self.render(into: context.cgContext, at: center, currentHeight: self.maxHeight)
    }
}
11:34 In the render(into:) method, we first deal with the empty case
again. If the tree is empty, we simply return. In the same statement, we can get
out the element and the subtrees:
func render(into context: CGContext, at center: CGPoint, currentHeight: Int) {
    guard case let .node(element, left, right) = self else { return }
    // TODO
}
12:39 When we know that we have an element, we can draw the node. We use
the fillEllipse helper method, which only needs a center point and a size. And
for the label, we draw the element as a string over the node using some string
attributes we've defined elsewhere:
func render(into context: CGContext, at center: CGPoint, currentHeight: Int) {
    guard case let .node(element, left, right) = self else { return }

    UIColor.black.setFill()
    context.fillEllipse(in: CGRect(center: center, size: nodeSize))
    "\(element)".draw(center: center, attributes: nodeAttributes)
}
14:21 We can already see an image at this point:
tree.render()

14:44 We only see the top node of the tree since we're not yet drawing
the subtrees. We'll do so by recursively calling the same render(into:) method
for both the left and right subtrees. For this, we need to calculate their
center points based on the current center point and an offset. The vertical
offset is the constant node height, and we calculate the horizontal offset from
currentHeight:
let offset = // TODO
if case .node = left {
    let leftCenter = CGPoint(x: center.x-offset, y: center.y+nodeSize.height)
    left.render(into: context, at: leftCenter, currentHeight: currentHeight-1)
}
16:49 From currentHeight we calculate how many nodes can fit on the
current row, just like before. This gives us the total width of the row, which
we divide by two to get the offset between the current center and the subtree's
center:
let offset = pow(2, CGFloat(currentHeight-1) * nodeSize.width / 2
18:14 Something is still off, because in the render method we started
rendering nodes with the wrong currentHeight. Maybe it wasn't so smart to not
use a zero-based height after all. When we subtract 1 we fix the issue, and now
we see the entire left side of the tree being drawn. We copy the code and update
it to draw the right subtree as well:
if case .node = right {
    let rightCenter = CGPoint(x: center.x+offset, y: center.y+nodeSize.height)
    right.render(into: context, at: rightCenter, currentHeight: currentHeight-1)
}
19:30 We can easily add lines between the nodes using the center points of the current node and the left and right subtrees. It's important that we draw the lines first, the nodes next, and the labels on top of everything last. The complete method now looks like this:
func render(into context: CGContext, at center: CGPoint, currentHeight: Int) {
    guard case let .node(element, left, right) = self else { return }

    let offset = pow(2, CGFloat(currentHeight-1) * nodeSize.width / 2
    if case .node = left {
        let leftCenter = CGPoint(x: center.x-offset, y: center.y+nodeSize.height)
        context.drawLine(from: center, to: leftCenter)
        left.render(into: context, at: leftCenter, currentHeight: currentHeight-1)
    }
    if case .node = right {
        let rightCenter = CGPoint(x: center.x+offset, y: center.y+nodeSize.height)
        context.drawLine(from: center, to: rightCenter)
        right.render(into: context, at: rightCenter, currentHeight: currentHeight-1)
    }

    UIColor.black.setFill()
    context.fillEllipse(in: CGRect(center: center, size: nodeSize))
    "\(element)".draw(center: center, attributes: nodeAttributes)
}
20:37 We can clean this up a bit by using a local function instead of having almost duplicate code to draw both subtrees:
func render(into context: CGContext, at center: CGPoint, currentHeight: Int) {
        guard case let .node(element, left, right) = self else { return }

        let offset = pow(2, CGFloat(currentHeight)-1) * nodeSize.width
        func recurse(child: BinaryTree, offset: CGFloat) {
            guard case .node = child else { return }
            let childCenter = CGPoint(x: center.x+offset, y: center.y+nodeSize.height)
            context.drawLine(from: center, to: childCenter)
            child.render(into: context, at: childCenter, currentHeight: currentHeight-1)

        }
        recurse(child: left, offset: -offset)
        recurse(child: right, offset: offset)

        UIColor.black.setFill()
        context.fillEllipse(in: CGRect(center: center, size: nodeSize))
        "\(element)".draw(center: center, attributes: nodeAttributes)
    }
23:03 Everything is drawn very tightly now, but it'd be nice to add some spacing between the nodes. We define a tuple with factors for the node width and height:
let spacing = (horizontal: 1.5 as CGFloat, vertical: 1.5 as CGFloat)
24:04 We use this spacing in our calculation of the bounds. We ignore the fact that this gives us some extra space — not just between nodes, but also outside the tree:
var bounds: CGRect {
    let width = pow(2, CGFloat(maxHeight)-1) * nodeSize.width * spacing.horizontal
    let height = CGFloat(maxHeight) * nodeSize.height * spacing.vertical
    return CGRect(origin: .zero, size: CGSize(width: width, height: height))
}
24:54 We also have to apply the spacing factor to the offset between nodes:
func render(into context: CGContext, at center: CGPoint, currentHeight: Int) {
        // ...
        let offset = pow(2, CGFloat(currentHeight)-1) * nodeSize.width * spacing.horizontal / 2

        func recurse(child: BinaryTree, offset: CGFloat) {
            // ...
            let childCenter = CGPoint(x: center.x+offset, y: center.y + nodeSize.height*spacing.vertical)
            // ...

        }
        // ...
    }
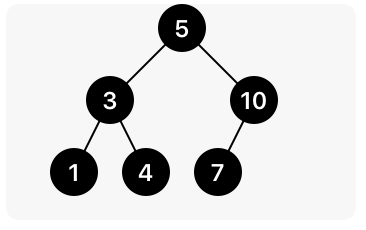
25:24 With this in place, we render a nice-looking image:
25:35 Finally, we can implement Quick Look for BinaryTree so that we
can view the image representation of a tree without manually calling the render
method:
extension BinaryTree: CustomPlaygroundQuickLookable {
    public var customPlaygroundQuickLook: PlaygroundQuickLook {
        return .image(render())
    }
}
26:52 Another cool improvement would be to animate nodes and branches when the tree updates, but that would probably require an entirely different implementation using subviews and constraints.
27:12 It's worth noting we didn't write this code in half an hour. It took us quite a bit of time, with three developers, to figure out the math and then to simplify the implementation.
Written in Swift 4
Become a subscriber to download episode videos.
4 Episodes · 1h53min
Episode 499 · Jul 10
Episode 498 · Jul 03
Episode 497 · Jun 26
Episode 496 · Jun 19
Episode 495 · Jun 12
Episode 494 · Jun 05
Episode 493 · May 29
Episode 492 · May 15
Unlock Full Access
A new episode every week
Take Swift Talk with you when you're offline
With your help we can keep producing new episodes