00:06 Today, we'll start working on a pretty printing library based on an
A prettier
printer, an
old paper about implementing it in Haskell. We ported the library to Swift, and
then we came up with a very different implementation. If we were to compare the
two approaches, we'd hardly see any similarities in code, but they do the same
thing.
00:49 A pretty printer helps us generate structured text by using
tree-like data structures. We could use this, for example, to output indented
Swift code. The library also allows us to specify multiple layouts, which can be
used to optimize the output based on the available space — e.g. a computed
property might be printed on a single line if it fits, but if it's too long, the
library could choose a version of the property that's formatted over multiple
lines with an indented part between the curly braces.
01:45 Anyone who has tried to display code knows that proper formatting
makes a big difference in terms of legibility. If we only use standard word
wrapping, it becomes very difficult to read the code. This is where the library
will come in handy.
Data Structure
01:57 Let's start with an enum that represents a tree-based document:
indirect enum Doc {
    case empty
    case text(String)
    case sequence(Doc, Doc)
    case newline
    case indent(Doc)
    case choice(Doc, Doc)
}
The enum has cases for an empty value, a string, and a newline. Technically, we
could represent an empty value with an empty string, but having a separate case
for .empty works as well. The .sequence case concatenates two documents,
which results in the first document being printed, followed by the second
document on the same line. The .indent case indents a document by one level.
02:49 Finally, the .choice case is used to output one of two
documents. This isn't a random choice, rather it's determined by the available
space. The library first checks if the left document fits — and we can define
what it means to fit. If it doesn't fit, the library picks the right document.
For this to work, we have to assume the left document is always wider than the
right document.
04:01 The other thing we need is a pretty printing function, which we
write in an extension on Doc:
extension Doc {
    func pretty(columns: Int) -> String {
        fatalError()
    }
}
Sample Document
04:19 We can now define a sample document. Let's try to render a simple
Swift function that prints the word "Hello":
func hello() {
    print("Hello")
}
04:42 We could represent this function using our enum by wrapping it
entirely in a .text case:
let doc = Doc.text("""
func hello() {
    print("Hello")
}
""")
But the whole idea is to give this some more structure, so we should break it up
into more pieces, starting with a .text containing the first line, followed by
a .newline and an indented .text of the second line. We finish the document
with another .newline and a .text containing the closing curly brace:
let doc = Doc.text("func hello() {") + .newline + .indent(.text("print(\"Hello\")")) + .newline + .text("}")
05:51 To make the + operator work, we implement the following function
that wraps the documents on either side of the operator in a .sequence. Having
this operator helps us avoid writing many levels of nesting:
extension Doc {
    static func +(lhs: Doc, rhs: Doc) -> Doc {
        .sequence(lhs, rhs)
    }
}
06:20 For the indentation, it makes sense that we include the .newline
in the indented block, because we know that we have to insert the spaces for
indentation at the start of a line:
let doc = Doc.text("func hello() {") + .indent(.newline + .text("print(\"Hello\")")) + .newline + .text("}")
Rendering
07:13 When we try to evaluate a Doc, we'll switch over all the enum
cases, but we'll have to keep track of a few things, such as the column width,
the current indentation level, and — later on — also the current position. We
write a struct to hold all of this state, and since we can also use this struct
as a state machine during the evaluation, we add a stack of values that still
need to be evaluated:
struct PrettyState {
    var columnWidth: Int
    var stack: [Doc]

    init(columnwidth: Int, doc: Doc) {
        self.columnWidth = columnwidth
        self.stack = [doc]
    }
}
08:29 In a render method, we're going to process the stack into a
string. The first thing we do is check if the stack is empty, and if it is, we
return an empty string. Otherwise, we switch over the first document and handle
each of the possible cases. For an .empty case, we return an empty string. For
.text, we return the contained string. For a .sequence, we need to render
both its documents, so that we can push both onto the stack. And because we use
the stack array as a stack, we need to do this in reverse order so that the
first document will be evaluated first:
struct PrettyState {
    var columnWidth: Int
    var stack: [Doc]

    init(columnwidth: Int, doc: Doc) {
        self.columnWidth = columnwidth
        self.stack = [doc]
    }

    mutating func render() -> String {
        guard let el = stack.popLast() else { return "" }
        switch el {
        case .empty:
            return ""
        case .text(let string):
            return string
        case .sequence(let doc, let doc2):
            stack.append(doc2)
            stack.append(doc)
            return render()
        case .newline:
            return "\n"
        case .indent(let doc):
            stack.append(doc)
            return render()
        case .choice(let doc, let doc2):
            fatalError()
        }
    }
}
10:08 In the .indent case, we push the contained document onto the
stack, and we call render. We're not adding any indentation yet, but we'll add
it later.
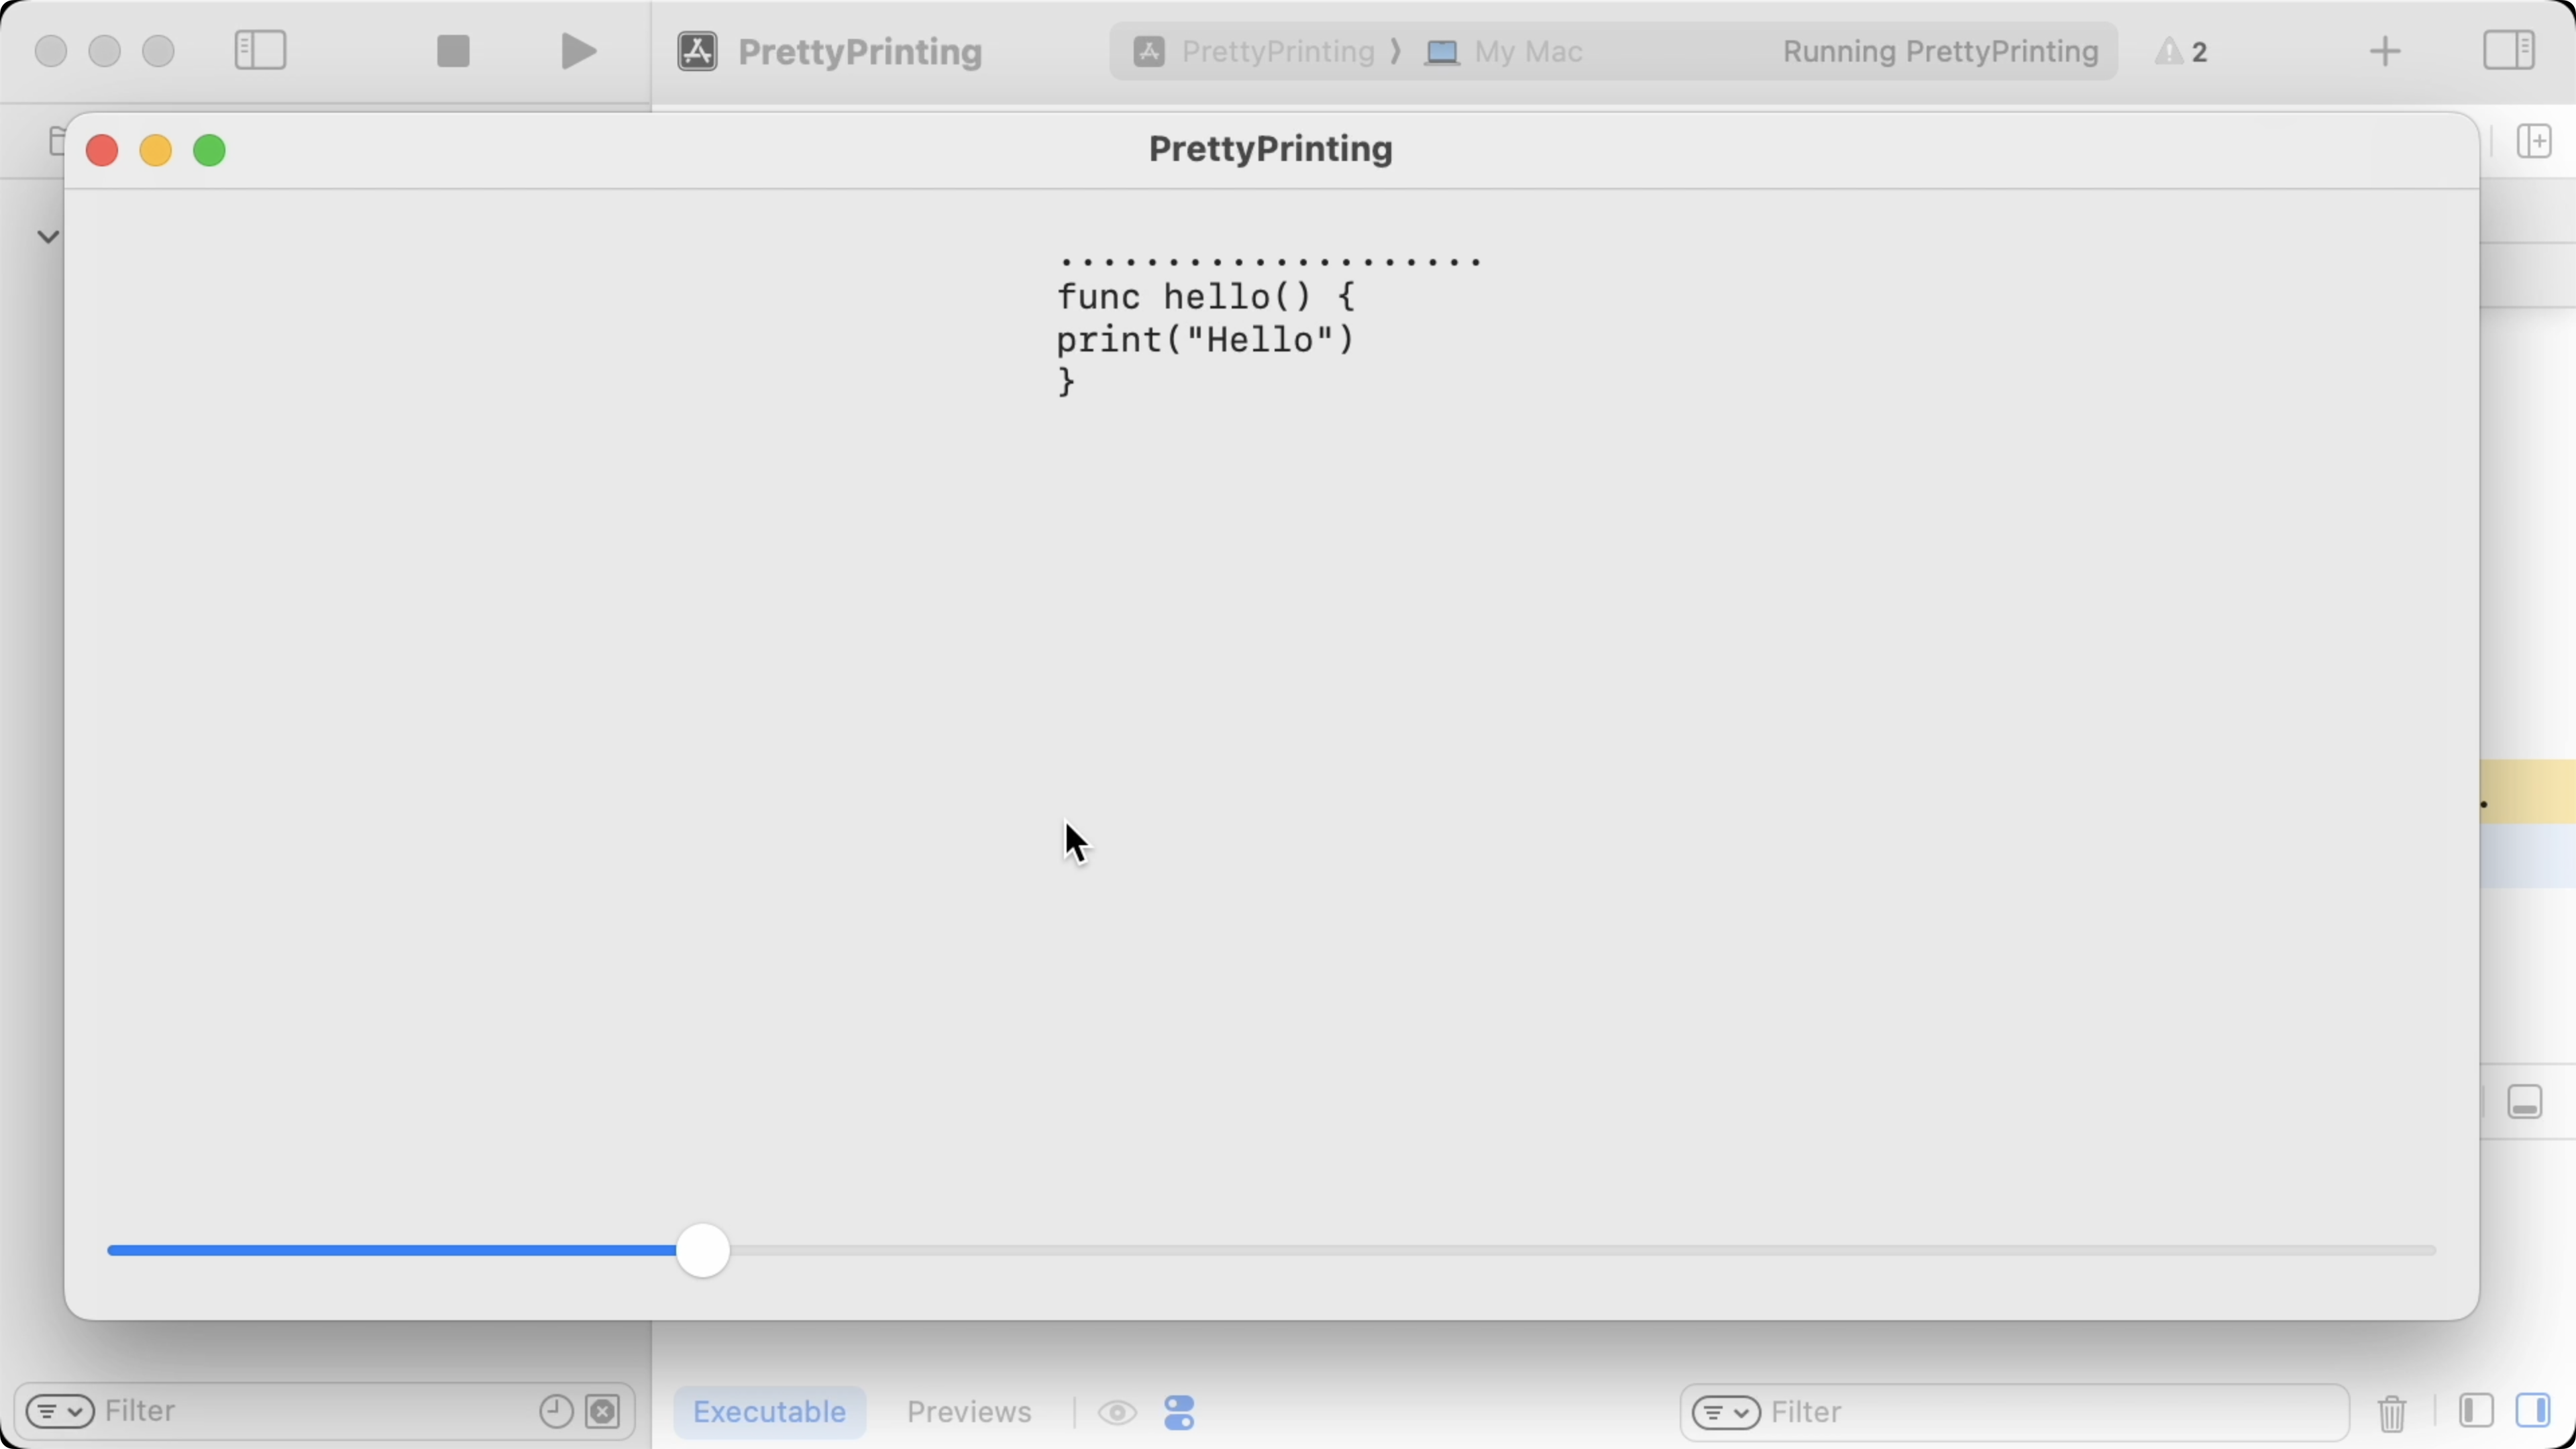
10:31 Let's first see if we can actually render anything. We modify
ContentView to show our rendered document. We also add a slider so that we can
change the column width at runtime. Above the rendered string, we add another
string of periods to display the current column width:
struct ContentView: View {
    @State private var width = 20.0

    var body: some View {
        VStack {
            VStack(alignment: .leading) {
                Text(String(repeating: ".", count: Int(width)))
                Text(doc.pretty(columns: Int(width)))
                    .fixedSize()
            }
            Spacer()
            Slider(value: $width, in: 0...80)
        }
        .monospaced()
        .padding()
    }
}
12:03 Before we can run this, we have to implement the pretty method
on Doc. We do so by creating a PrettyState and calling its render method:
extension Doc {
    func pretty(columns: Int) -> String {
        var state = PrettyState(columnwidth: columns, doc: self)
        return state.render()
    }
}
12:27 The number of periods changes when we move the slider. Of course,
this width doesn't affect our rendered string yet because we're ignoring the
column width. But there's another problem: we only see the first line of the
sample function.
13:12 We need to adjust the render method so that it calls itself
after each case, because otherwise we stop processing the stack after the first
element. After we fix this, we see the entire function, albeit without
indentation:
struct PrettyState {
    var columnWidth: Int
    var stack: [Doc]
    var tabWidth = 4

    init(columnwidth: Int, doc: Doc) {
        self.columnWidth = columnwidth
        self.stack = [doc]
    }

    mutating func render() -> String {
        guard let el = stack.popLast() else { return "" }
        switch el {
        case .empty:
            return "" + render()
        case .text(let string):
            return string + render()
        case .sequence(let doc, let doc2):
            stack.append(doc2)
            stack.append(doc)
            return render()
        case .newline:
            return "\n" + render()
        case .indent(let doc):
            stack.append(doc)
            return render()
        case .choice(let doc, let doc2):
            fatalError()
        }
    }
}
Indentation
14:21 To properly indent the text, we have to somehow keep track of the
current indentation level. Then, when we hit a .newline, we can use that level
to insert the correct number of spaces or tabs.
15:05 The question is, how do we store the indentation level? After we
render the first line of our function, we want to indent the line with the print
statement. After that, we want to go back to having no indentation for the curly
brace. So, rather than storing the indentation level as a property in
PrettyState, we should store it along with each document on the stack. That
way, the indentation level can be modified for a specific part of the document.
15:40 So we change the stack array to hold tuples of indentation
levels and documents. We update the initializer to start the first document with
indentation level zero:
struct PrettyState {
var columnWidth: Int
var stack: [(indentation: Int, Doc)]
init(columnwidth: Int, doc: Doc) {
self.columnWidth = columnwidth
self.stack = [(0, doc)]
}
mutating func render() -> String {
}
}
16:00 Inside render, we destructure the tuple from the stack into an
indentation level and a document. In the .sequence case, we push the same
indentation level onto the stack. But in the .indent case, we increase the
indentation level by one:
struct PrettyState {
    var columnWidth: Int
    var stack: [(indentation: Int, Doc)]

    init(columnwidth: Int, doc: Doc) {
        self.columnWidth = columnwidth
        self.stack = [(0, doc)]
    }

    mutating func render() -> String {
        guard let (indentation, el) = stack.popLast() else { return "" }
        switch el {
        case .empty:
            return "" + render()
        case .text(let string):
            return string + render()
        case .sequence(let doc, let doc2):
            stack.append((indentation, doc2))
            stack.append((indentation, doc))
            return render()
        case .newline:
            return "\n" + render()
        case .indent(let doc):
            stack.append((indentation + 1, doc))
            return render()
        case .choice(let doc, let doc2):
            fatalError()
        }
    }
}
16:56 We add a tabWidth property to define the number of spaces for
each indentation level, which we then use to insert spaces when we render the
.newline case:
struct PrettyState {
    var columnWidth: Int
    var stack: [(indentation: Int, Doc)]
    var tabWidth = 4

    init(columnwidth: Int, doc: Doc) {
        self.columnWidth = columnwidth
        self.stack = [(0, doc)]
    }

    mutating func render() -> String {
        guard let (indentation, el) = stack.popLast() else { return "" }
        switch el {
        case .empty:
            return "" + render()
        case .text(let string):
            return string + render()
        case .sequence(let doc, let doc2):
            stack.append((indentation, doc2))
            stack.append((indentation, doc))
            return render()
        case .newline:
            return "\n" + String(repeating: " ", count: indentation * tabWidth) + render()
        case .indent(let doc):
            stack.append((indentation + 1, doc))
            return render()
        case .choice(let doc, let doc2):
            fatalError()
        }
    }
}
17:26 Our slider still doesn't do anything, because we haven't yet
implemented the .choice case — but the indentation works:

17:42 If we wrap the entire document in an .indent, we'll see that
the function's first line stays at the same place, but the print statement and
the closing curly brace will be indented. So the indentation level only has an
effect on how we render newlines:
let doc = Doc.indent(Doc.text("func hello() {") + .indent(.newline + .text("print(\"Hello\")")) + .newline + .text("}"))
18:36 We can now print documents with indentation. But the missing
piece is, of course, the .choice case. Let's take a look at that next time.
