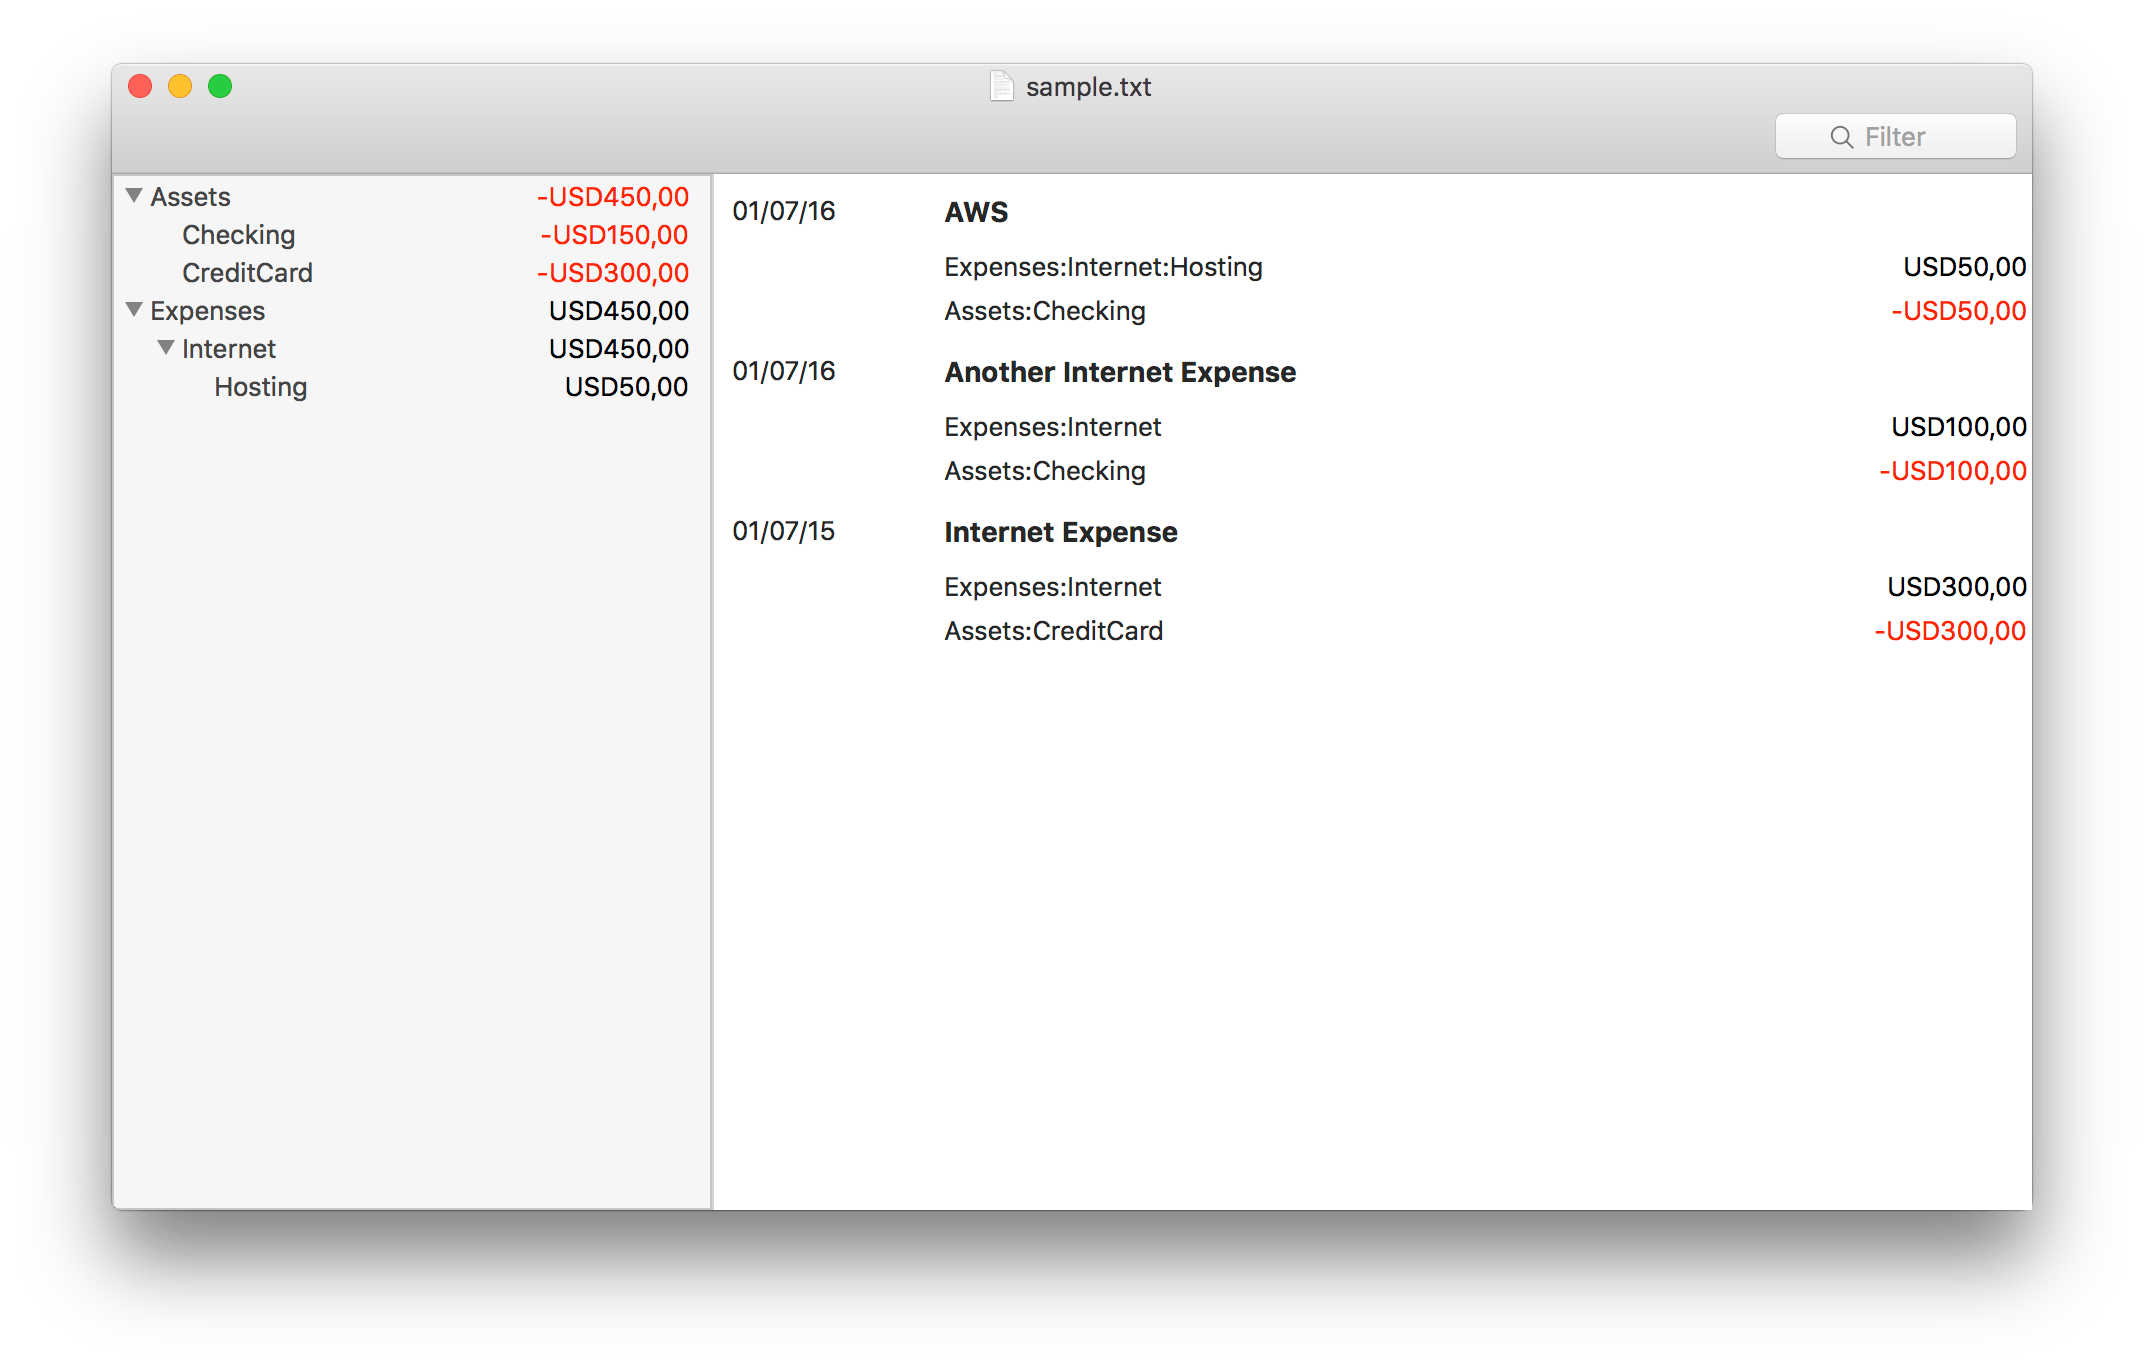
00:06 Today we'll take a look at the architecture of our Ledger
GUI Mac app. More specifically, we'll look
at two things: how we get the data to the view controllers, and how we hook up
the balance view controller on the right with the register view controller on
the left. When you select an account on the left-hand side, the transactions on
the right should be filtered so that you only see the ones that contain the
selected account:
00:58 First, we'll look at how we get the data to the view controllers.
There are two basic ways of doing this: either the view controller retrieves the
data from somewhere, or we set the data on the view controller from the outside.
In our example, we'll use the latter approach, since we want the view
controllers to know as little as possible about their context.
Setting Data on the View Controllers
01:18 We start with a skeleton of the app that doesn't yet display any
data:
01:37 The location where we're going to set the data on the view
controllers and later establish the communication between the two view
controllers is the LedgerDocumentController. This class is very similar to the
App class we showed in the episode about Connecting View
Controllers
on iOS, in that it has the responsibility of hooking everything up. In our Mac
app, an instance of this class gets created for us, so we'll just deal with its
implementation. To start with, the class looks like this:
final class LedgerDocumentController {
    var ledger: Ledger = Ledger()
    var windowController: LedgerWindowController?
}
02:08 Both properties, ledger and windowController, get set from the
outside. ledger is a simple struct that contains all the data of our ledger
file, i.e. all the transactions, all the accounts, and a few other things. The
window controller is specific to the Mac; you can think of a root view
controller as an iOS equivalent. Once we have a window controller, we can use it
to get a reference to the view controllers in order to configure them. We use a
property observer for that:
final class LedgerDocumentController {
var windowController: LedgerWindowController? {
didSet {
windowController?.balanceViewController?.balanceTree = ledger.balanceTree
windowController?.registerViewController?.transactions = ledger.evaluatedTransactions
}
}
}
03:58 Both view controllers are already implemented in a way that
they'll display the data we set on the balanceTree and transactions
properties, so at this point, we already see our data in the UI. However,
selecting an account on the left-hand side still doesn't do anything.
04:24 Before we make this work, we still have to deal with another
problem in our code. Currently, we're lucky that our code works as expected,
because the ledger property gets set before the windowController property
gets set. But this hidden API contract can easily bite us later. Additionally,
the data on screen wouldn't update if we would re-read the file from disk and
set the ledger property again. So we'll add a didSet on ledger as well and
pull out the configuration of the view controllers into an update method:
final class LedgerDocumentController {
    var ledger: Ledger {
		didSet {
			update()
		}
	}

    var windowController: LedgerWindowController? {
        didSet {
            update()
        }
    }

    func update() {
        windowController?.balanceViewController?.balanceTree = ledger.balanceTree
        windowController?.registerViewController?.transactions = ledger.evaluatedTransactions
    }
}
05:39 Another subtle detail we should take care of: before we set new
data on the view controllers, we have to be sure to be on the main queue. Since
reading the file might happen on a background queue, and the ledger property
might be set on a background queue as a result, we dispatch the call to update
onto the main queue:
final class LedgerDocumentController {
var ledger: Ledger {
didSet {
DispatchQueue.main.async {
self.update()
}
}
}
}
Filtering Transactions by Account
06:27 Now we can make the selection in the view controller on the left
work. For this, we use an approach similar to the one we used in the Connecting
View
Controllers
episode: we define a callback property — didSelect — on the left view
controller, which gets called when the user selects or deselects a row. The type
of this property is an optional function with a single (optional) string
argument:
class BalanceViewController: NSViewController {
var didSelect: ((String?) -> ())? {
}
}
07:45 Since we've factored out the data source and delegate methods of
the table view into a separate class, we have to forward this callback to the
data source/delegate object. To do this, we use a didSet on the didSelect
property and set the didSelect callback of our dataSourceAndDelegate object:
class BalanceViewController: NSViewController {
didSet {
dataSourceAndDelegate.didSelect = { node in
}
}
}
08:20 didSelect on the delegate object has an account tree node as
parameter, whereas the didSelect callback we defined on
BalanceViewController just takes an optional string parameter. So we extract
the account name from the tree node and pass it on to the view controller's
callback:
class BalanceViewController: NSViewController {
didSet {
dataSourceAndDelegate.didSelect = { node in
self.didSelect?(node?.accountName)
}
}
}
08:50 Now we can configure the BalanceViewController's didSelect
callback in the LedgerDocumentController. Once we have a window controller, we
add the callback and just print out the name of the selected account to check if
it works:
var windowController: LedgerWindowController? {
    didSet {
        windowController?.balanceViewController?.didSelect = { account in
			print(account)
        }
        update()
    }
}
10:14 Now that the callback on selection works, we can replace the print
statement with the actual implementation that causes the view controller on the
right to filter the transactions according to the selected account. One approach
we could take is to forward the account selection to the
RegisterViewController on the right — for example, by setting an
accountFilter property on the view controller:
var windowController: LedgerWindowController? {
    didSet {
        windowController?.balanceViewController?.didSelect = { account in
            self.windowController?.registerViewController?.accountFilter = account
        }
        update()
    }
}
11:05 However, this would complicate the RegisterViewController quite
a bit. We'd have to keep the original contents of its transactions property
around to handle deselection and add a new property that contains only the
transactions that should be displayed according to the accountFilter property.
11:28 Instead, we'll handle the filtering of the transactions in the
LedgerDocumentController so that the RegisterViewController doesn't have to
know anything about filtering itself.
11:46 We add a property, accountFilter, to LedgerDocumentController,
which stores the currently selected account:
var accountFilter: String?

var windowController: LedgerWindowController? {
    didSet {
        windowController?.balanceViewController?.didSelect = { account in
            self.accountFilter = account
        }
        update()
    }
}
12:02 Then we add a property observer on accountFilter, which calls
update:
var accountFilter: String? {
	didSet {
		update()
	}
}
12:07 Lastly, we change the update method to set the filtered
transactions on the RegisterViewController. In the filter function, we use an
existing method on transactions, matches, which checks whether an account
appears in one of the transaction's postings:
func update() {
    windowController?.balanceViewController?.balanceTree = ledger.balanceTree
    windowController?.registerViewController?.transactions = ledger.evaluatedTransactions.filter {
        $0.matches(accountFilter)
    }
}
Using a Struct to Encapsulate Application State
12:56 In the next step, let's improve the design of our
LedgerDocumentController class. Our current approach requires implementing a
didSet with a call to update on any property that would affect the UI.
Currently, this only pertains to the ledger and the accountFilter
properties, but in a more mature app, this would get very complicated.
13:20 We'll try to pull out all those properties into a separate struct,
LedgerDocumentState:
struct LedgerDocumentState {
    var ledger: Ledger = Ledger()
    var accountFilter: String?
}
14:06 Now we have to add a state property to the
LedgerDocumentController and make the ledger property a simple proxy for the
ledger property on the state struct:
final class LedgerDocumentController {
var state = LedgerDocumentState() {
didSet {
update()
}
}
var ledger: Ledger {
get { return state.ledger }
set { state.ledger = newValue }
}
}
15:07 After we've changed our code to make use of the new state
property, the complete LedgerDocumentController looks like this:
final class LedgerDocumentController {
    var state = LedgerDocumentState() {
        didSet {
            update()
        }
    }

    var ledger: Ledger {
        get { return state.ledger }
        set { state.ledger = newValue }
    }

    var windowController: LedgerWindowController? {
        didSet {
            windowController?.balanceViewController?.didSelect = { account in
                self.state.accountFilter = account
            }
            update()
        }
    }

    func update() {
        windowController?.balanceViewController?.balanceTree = ledger.balanceTree
	    windowController?.registerViewController?.transactions = ledger.evaluatedTransactions.filter {
	        $0.matches(state.accountFilter)
	    }
    }
}
15:45 Since we've defined the LedgerDocumentState as a struct, the
didSet on the state property gets triggered each time anything in the state
changes. That's a key feature of structs, compared to classes: whenever you
change something in a struct, it results in a new value.
16:10 Now that we have this LedgerDocumentState struct, there's one
more refactoring we'll do — we'll add a filteredTransactions property on the
state struct to pull out the filtering we currently do in the update method:
struct LedgerDocumentState {
var filteredTransactions: [EvaluatedTransaction] {
return ledger.evaluatedTransactions.filter { transaction in transaction.matches(accountFilter) }
}
}
final class LedgerDocumentController {
func update() {
windowController?.balanceViewController?.balanceTree = ledger.balanceTree
windowController?.registerViewController?.transactions = state.filteredTransactions
}
}
17:28 It's nice to have things like filteredTransactions encapsulated
in a struct, because the struct is much easier to test in isolation compared to
the LedgerDocumentController.
17:53 In a future episode, we'll look at how to implement the search
field. Hopefully this will integrate well with our existing pattern and we won't
even need to touch our view controllers; we should be able to just add the
search logic to the LedgerDocumentState.
