
7 Episodes · 2h34min
- Custom Button Styles 14:28
- Self-Sizing Buttons 25:24
- Adding the Data Model 27:27
- Lap Times 21:50
- Analog Clock 22:24
- Analog Clock (Part 2) 23:48
- Scaling Text to Fit 18:50
Swift Talk # 192
Subscribers get exclusive access to new and all previous subscriber-only episodes, video downloads, and 30% discount for team members. Become a Subscriber →
We draw an analog clock face and add moving pointers.
00:06 A while ago, we were making a stopwatch app with SwiftUI. Today we'll work on a part that was still missing: an analog clock view, as featured in the standard iOS stopwatch.
00:35 We start by creating a new Clock view that displays 60 tick
marks. For each tick, we add a rotated Rectangle:
struct Clock: View {
    var body: some View {
        ZStack {
            ForEach(0..<60) { tick in
                Rectangle()
                    .fill(Color.primary)
                    .rotationEffect(Angle.degrees(Double(tick)/60 * 360))
            }
        }
    }
}
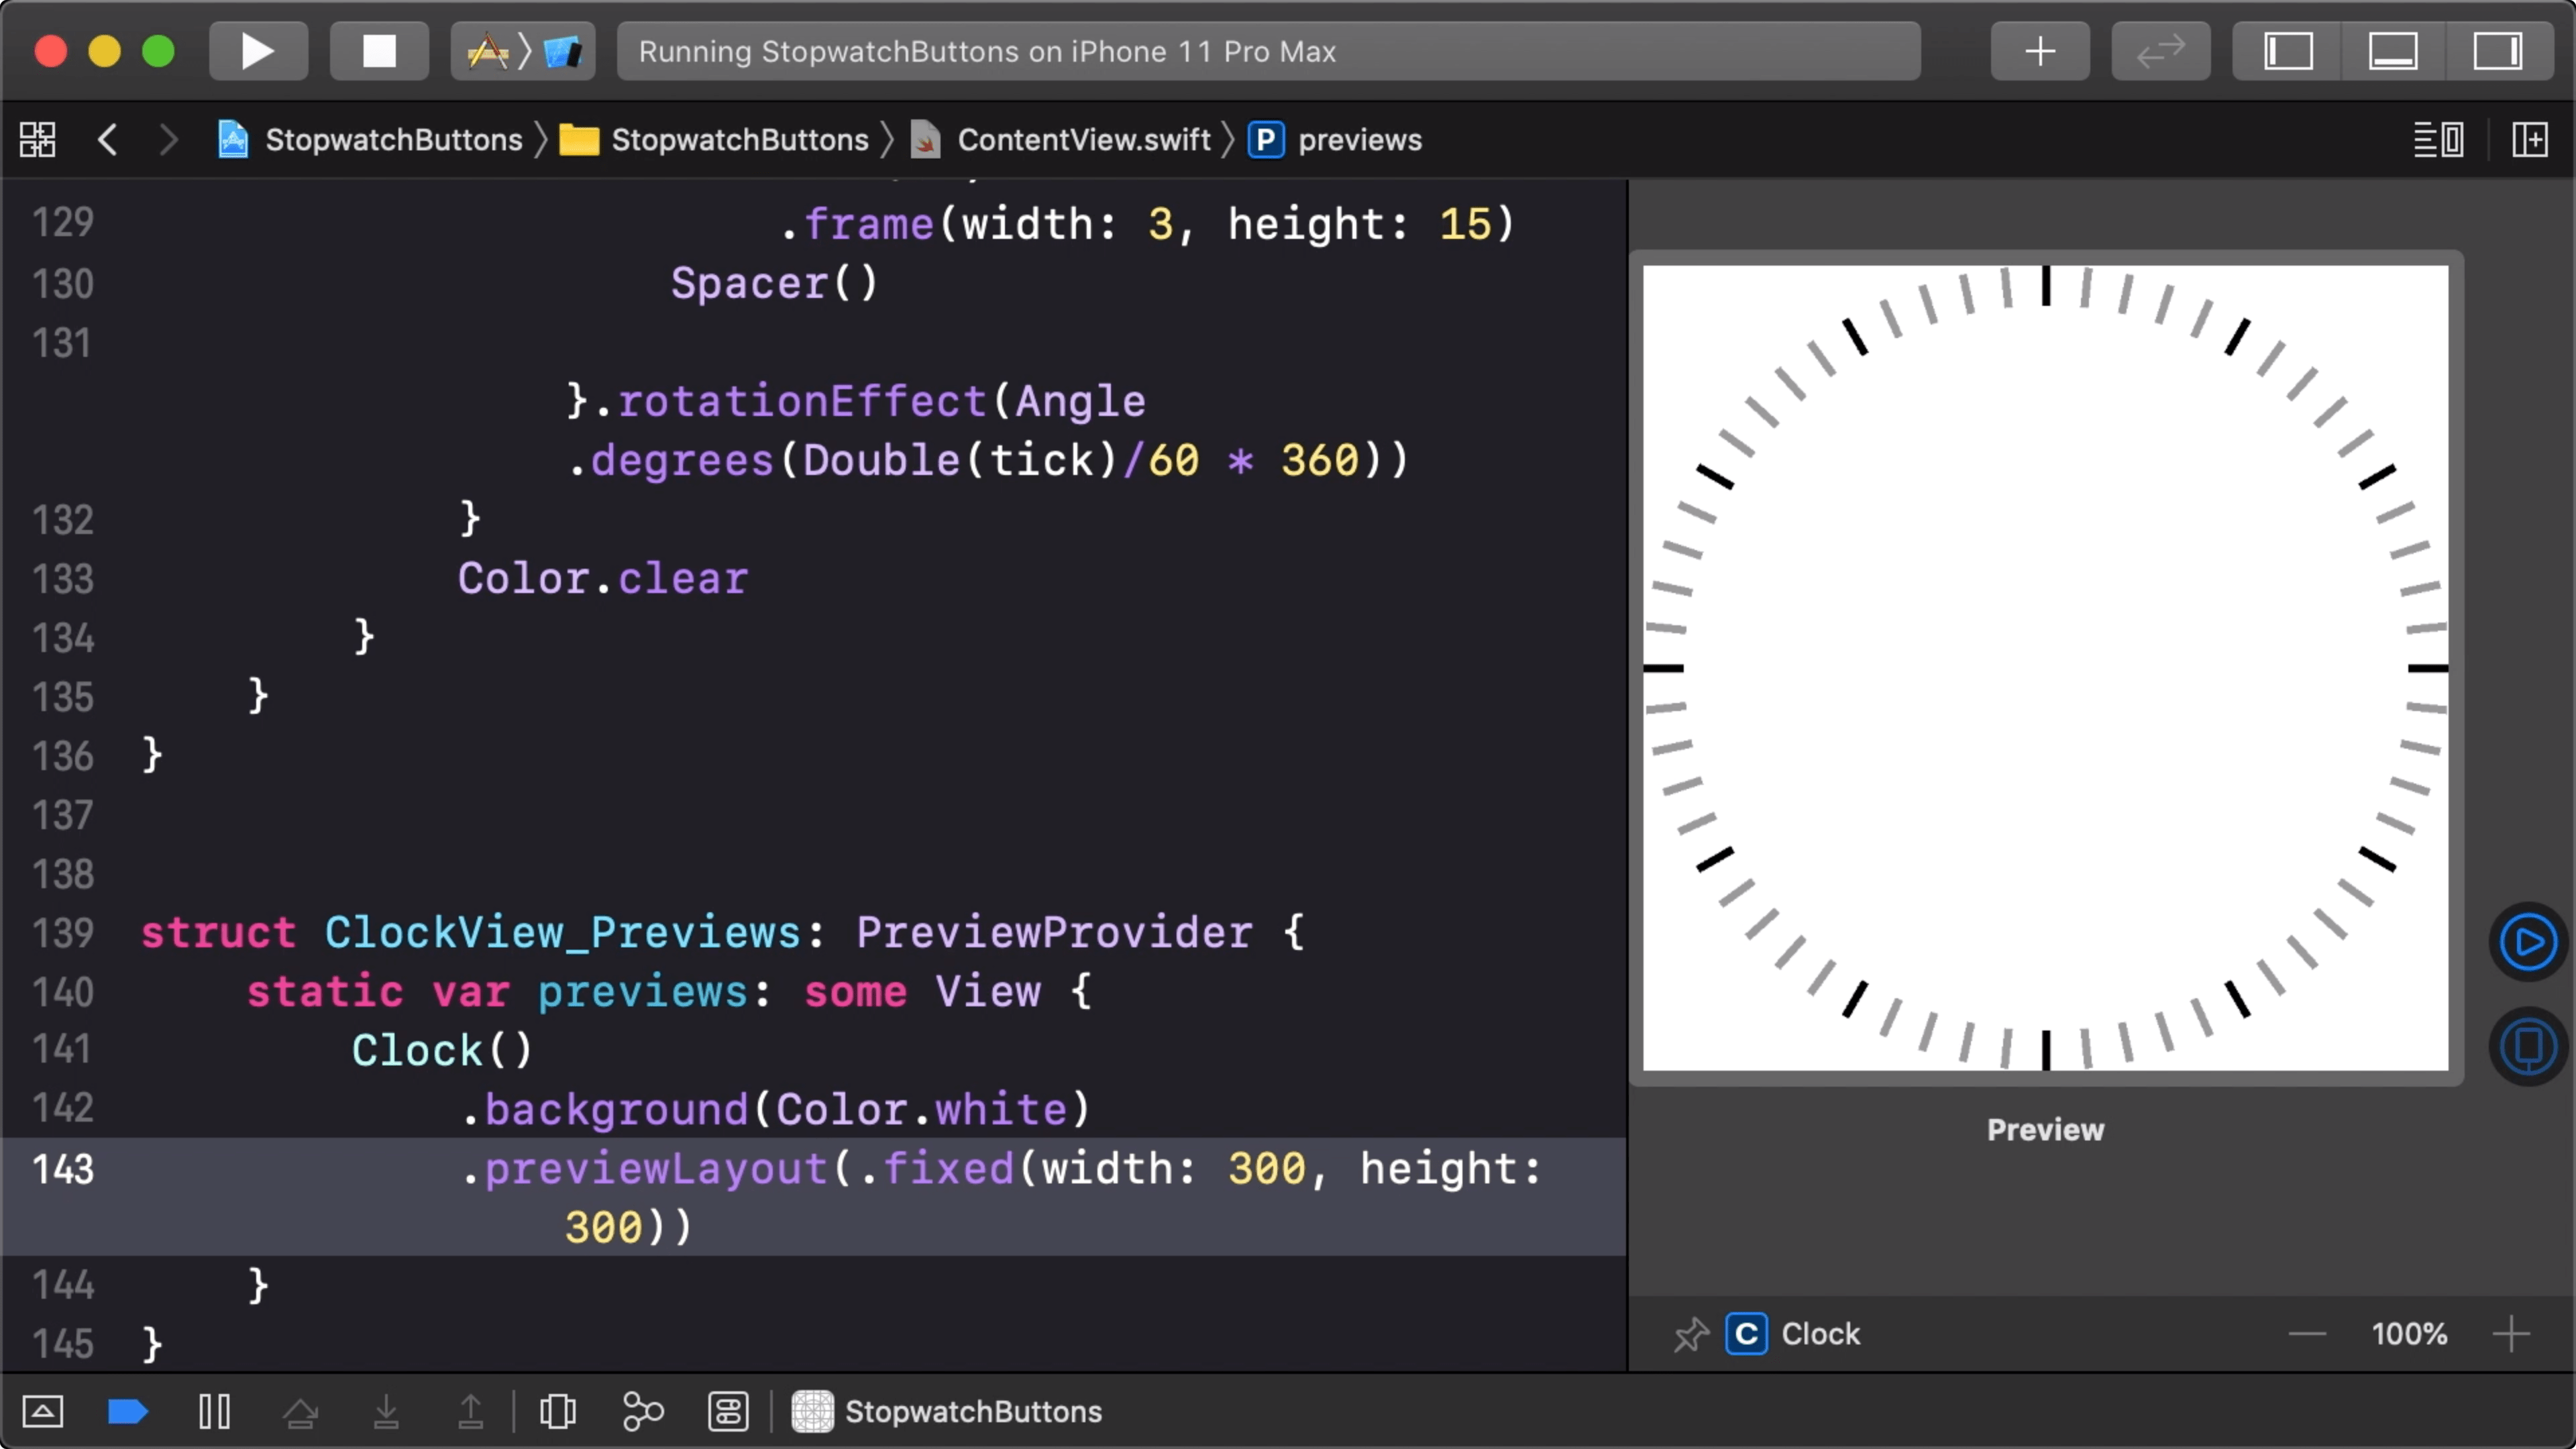
02:09 We add a Clock to the previews to see what's going on:
struct ClockView_Previews: PreviewProvider {
    static var previews: some View {
        Clock()
            .background(Color.white)
            .previewLayout(.fixed(width: 300, height: 300))
    }
}
02:25 The view stays completely black — the rectangles fill up the entire screen because we haven't yet given them a frame:
struct Clock: View {
    var body: some View {
        ZStack {
            ForEach(0..<60) { tick in
                Rectangle()
                    .fill(Color.primary)
                    .frame(width: 3, height: 15)
                    .rotationEffect(Angle.degrees(Double(tick)/60 * 360))
            }
        }
    }
}
02:58 Now the ticks are all drawn in the middle of the view, and they're rotated in place. Next we need to offset the rectangles away from the center:
struct Clock: View {
    var body: some View {
        ZStack {
            ForEach(0..<60) { tick in
                Rectangle()
                    .fill(Color.primary)
                    .frame(width: 3, height: 15)
                    .offset(y: -50)
                    .rotationEffect(Angle.degrees(Double(tick)/60 * 360))
            }
        }
    }
}
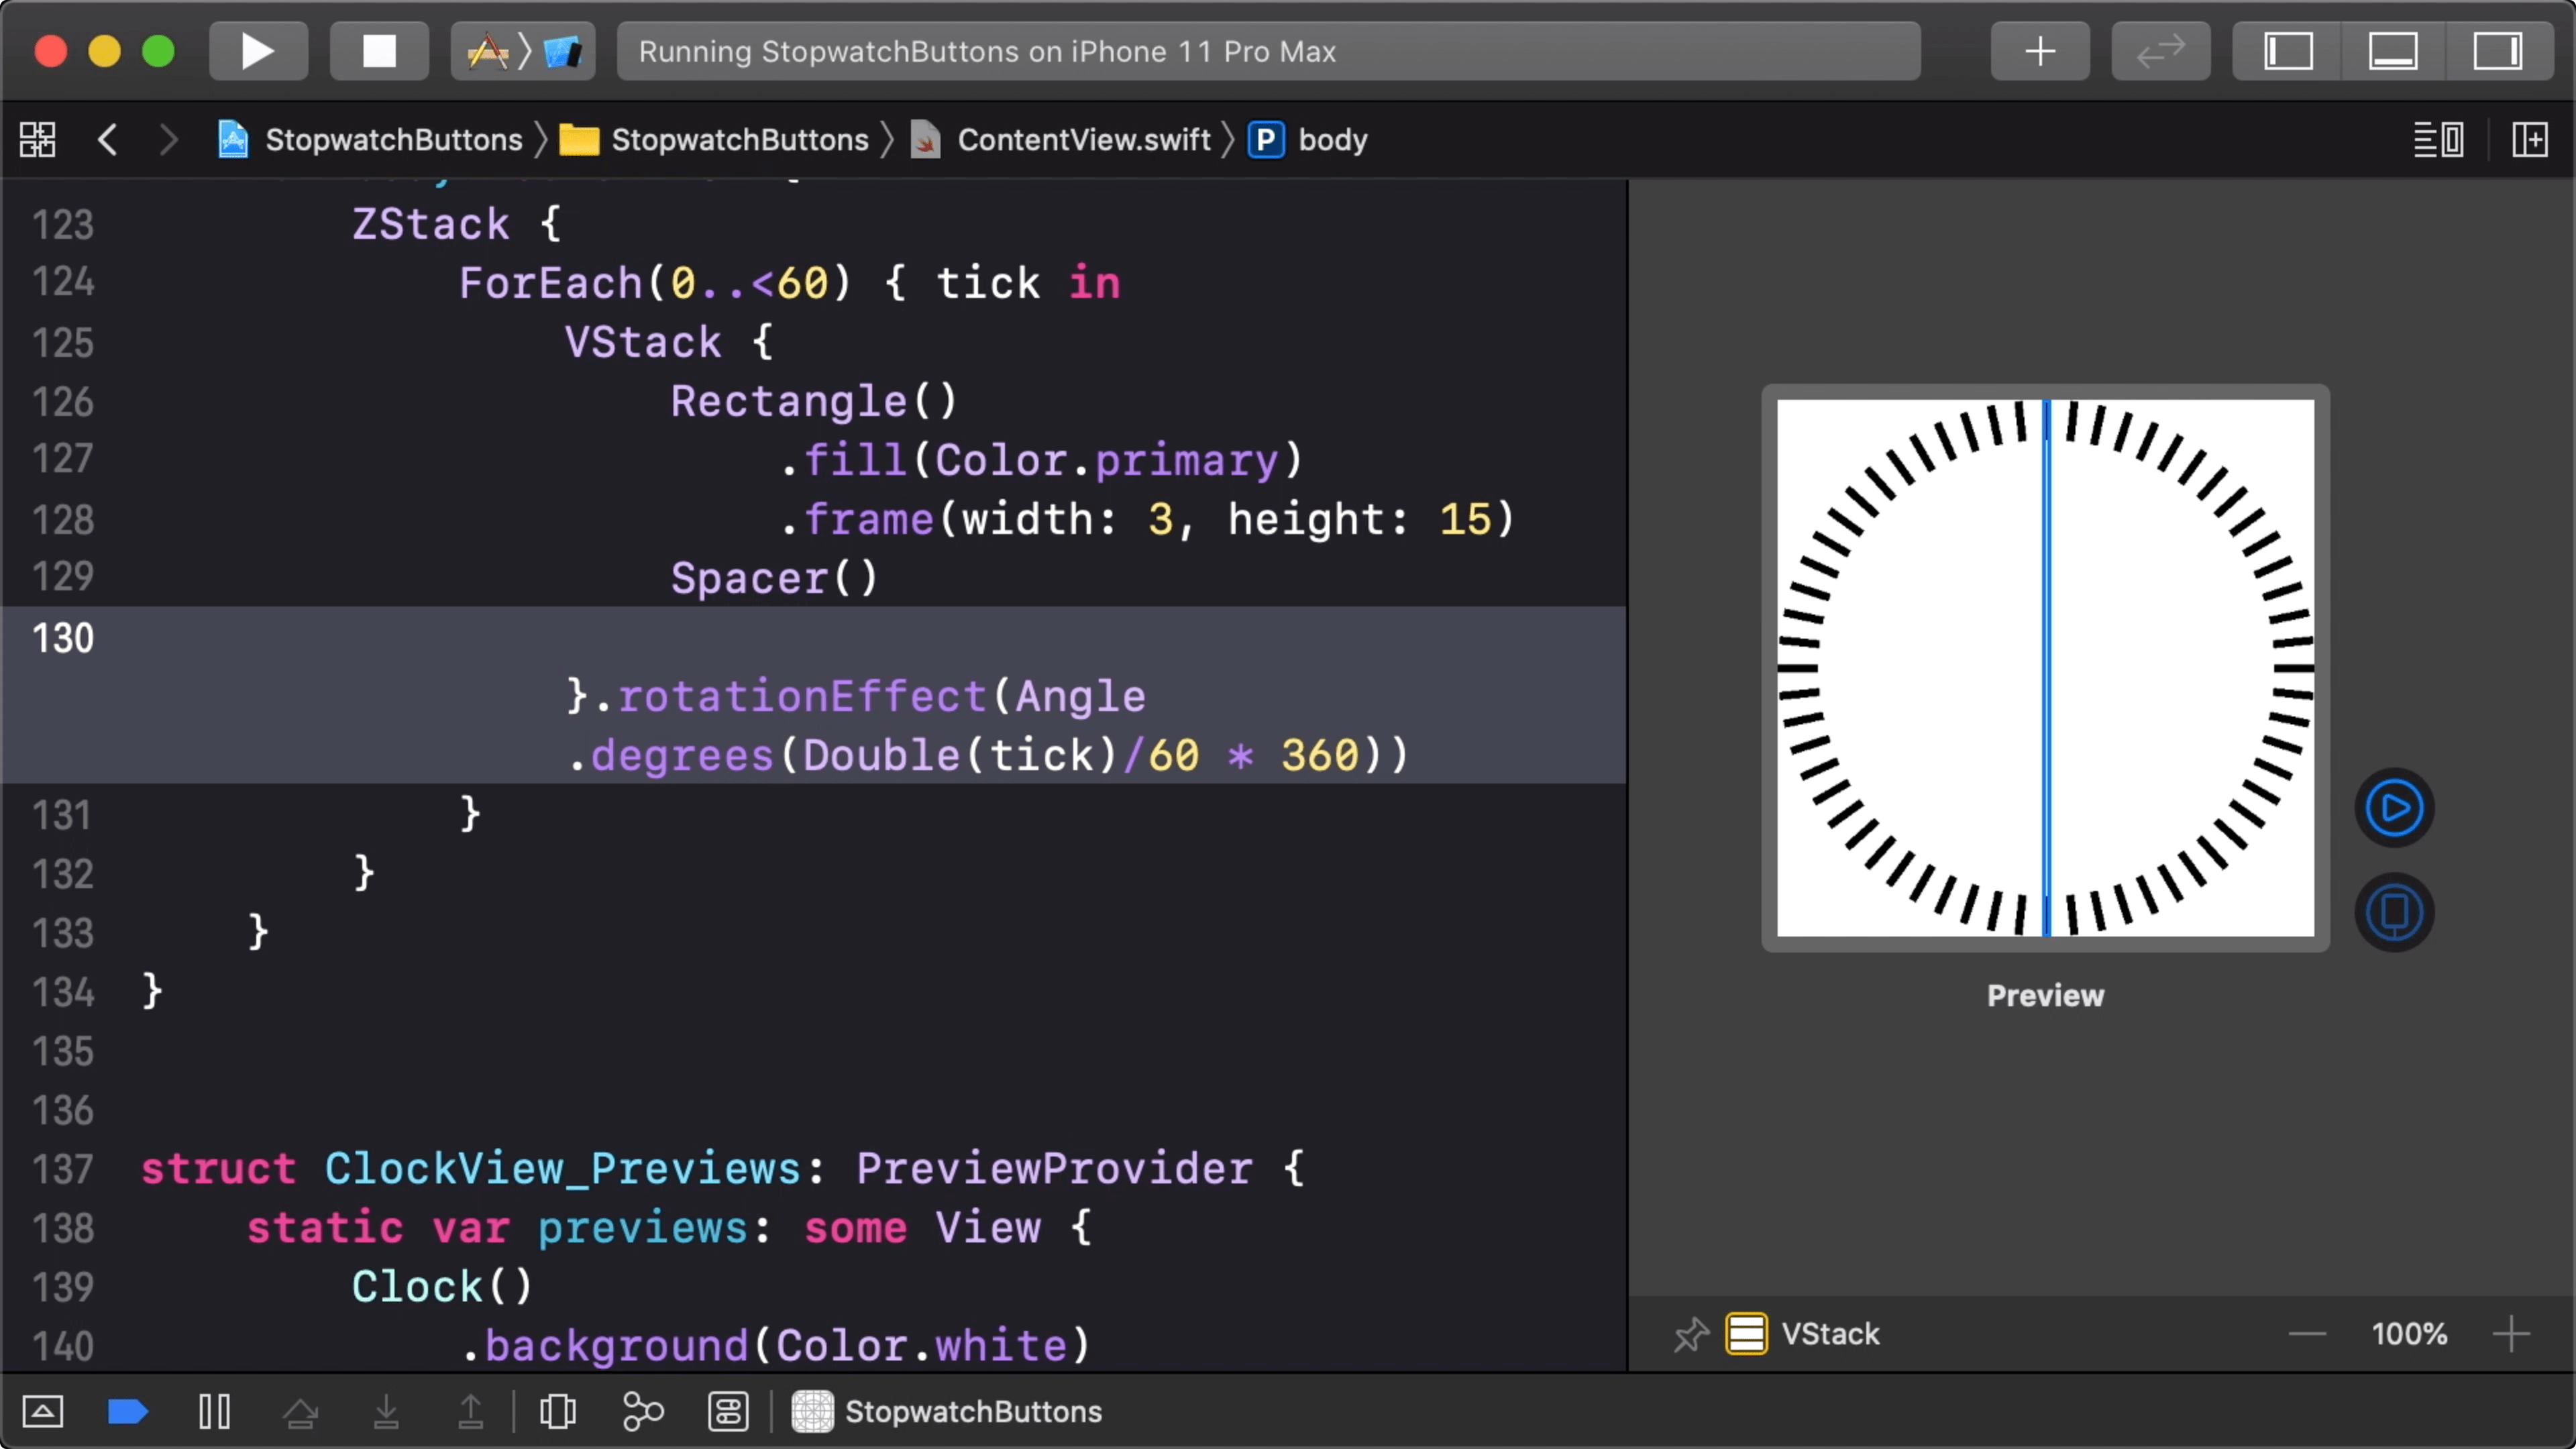
03:35 This looks okay, but as we can see in the preview, the ZStack
that wraps the ticks is only as small as a single tick:

03:50 By using an offset to position the ticks, we are effectively pushing them outside the clock view's bounds. This isn't ideal; we want the clock view to take up the size it gets proposed by the layout system.
04:09 Perhaps it would be better to construct the clock by creating a
custom Shape and drawing the tick marks using a path. However, it would be a
lot of work to calculate the points for that path. Another problem is that a
Shape takes a single color and the clock face has a few different colors:
between each of the 60 tick marks, there are three smaller tick marks with a
different shade. So we'd have to combine multiple shapes.
05:37 Our current setup is much simpler. And we can fix the layout issue
by putting each rectangle in a VStack, which takes on the available height. By
adding a spacer below the rectangle in the VStack, the rectangle gets pushed
up to the top of the stack. And we rotate the entire VStack in order to
position the tick mark:
struct Clock: View {
    var body: some View {
        ZStack {
            ForEach(0..<60) { tick in
                VStack {
                    Rectangle()
                        .fill(Color.primary)
                        .frame(width: 3, height: 15)
                    Spacer()
                }
                .rotationEffect(Angle.degrees(Double(tick)/60 * 360))
            }
        }
    }
}
This way, the clock view becomes as tall as the proposed size without us having to use a geometry reader:
06:19 The rotationEffect on the VStack doesn't influence the
VStack's frame: it just changes the presentation of the view without affecting
its surrounding layout. By adding a Color.clear to the root ZStack, the
stack grows as large as it is allowed because a color view always takes on the
available size:
struct Clock: View {
    var body: some View {
        ZStack {
            ForEach(0..<60) { tick in
                VStack {
                    Rectangle()
                        .fill(Color.primary)
                        .frame(width: 3, height: 15)
                    Spacer()
                }
                .rotationEffect(Angle.degrees(Double(tick)/60 * 360))
            }
            Color.clear
        }
    }
}
07:34 Now that we have a basic setup of our clock, let's do some styling. First, we highlight every fifth tick mark by applying different opacities:
struct Clock: View {
    var body: some View {
        ZStack {
            ForEach(0..<60) { tick in
                VStack {
                    Rectangle()
                        .fill(Color.primary)
                        .opacity(tick % 5 == 0 ? 1 : 0.4)
                        .frame(width: 3, height: 15)
                    Spacer()
                }
                .rotationEffect(Angle.degrees(Double(tick)/60 * 360))
            }
            Color.clear
        }
    }
}
09:13 In order to add subdivisions between full seconds, we increase the total amount of tick marks and adjust the other calculations accordingly:
struct Clock: View {
    var body: some View {
        ZStack {
            ForEach(0..<60*4) { tick in
                VStack {
                    Rectangle()
                        .fill(Color.primary)
                        .opacity(tick % 20 == 0 ? 1 : 0.4)
                        .frame(width: 3, height: 15)
                    Spacer()
                }
                .rotationEffect(Angle.degrees(Double(tick)/240 * 360))
            }
            Color.clear
        }
    }
}
09:48 Later on, we'll pull some of these magic numbers out into constants in order to make the clock configurable. We'll definitely need it to be configurable when we want to include a smaller clock that shows minutes passed inside this bigger one.
10:03 The compiler needs some help with understanding the view expression, so we pull the creation of a single tick out to a function:
struct Clock: View {
    func tick(at tick: Int) -> some View {
        VStack {
            Rectangle()
                .fill(Color.primary)
                .opacity(tick % 20 == 0 ? 1 : 0.4)
                .frame(width: 3, height: 15)
            Spacer()
        }
        .rotationEffect(Angle.degrees(Double(tick)/240 * 360))
    }

    var body: some View {
        ZStack {
            ForEach(0..<60*4) { tick in
                self.tick(at: tick)
            }
            Color.clear
        }
    }
}
11:07 That restores the preview, and we can see that we have a lot of extra tick marks now. Next, we make the full-second tick marks taller than the subdivision ticks:
struct Clock: View {
    func tick(at tick: Int) -> some View {
        VStack {
            Rectangle()
                .fill(Color.primary)
                .opacity(tick % 20 == 0 ? 1 : 0.4)
                .frame(width: 2, height: tick % 4 == 0 ? 15 : 7)
            Spacer()
        }
        .rotationEffect(Angle.degrees(Double(tick)/240 * 360))
    }

    var body: some View {
        ZStack {
            ForEach(0..<60*4) { tick in
                self.tick(at: tick)
            }
            Color.clear
        }
    }
}
11:50 The tick marks are looking a little cramped right now, so we
decrease their frame width from 3 points to 2 points.
12:03 Our clock now needs a second hand. We create a shape called
Pointer, in which, as a first version, we'll simply draw a line from the top
of the given frame to the center of the given frame:
struct Pointer: Shape {
    func path(in rect: CGRect) -> Path {
        Path { p in
            p.move(to: CGPoint(x: rect.midX, y: rect.minY))
            p.addLine(to: CGPoint(x: rect.midX, y: rect.midY))
        }
    }
}
13:29 Then we add the shape to the clock's ZStack so that the hand is
drawn over the tick marks:
struct Clock: View {
    // ...

    var body: some View {
        ZStack {
            ForEach(0..<60*4) { tick in
                self.tick(at: tick)
            }
            Pointer()
                .stroke(Color.orange, lineWidth: 2)
            Color.clear
        }
    }
}
14:01 A time property on the clock view can be used to rotate the
hand:
struct Clock: View {
    var time: TimeInterval = 10

    // ...

    var body: some View {
        ZStack {
            ForEach(0..<60*4) { tick in
                self.tick(at: tick)
            }
            Pointer()
                .stroke(Color.orange, lineWidth: 2)
                .rotationEffect(Angle.degrees(Double(time) * 360/60))
            Color.clear
        }
    }
}
15:01 Let's further improve the shape of the hand. In iOS, the stopwatch hand has a small circle in the center of the clock as well as a short line that extends from the center in the opposite direction. To copy this, we define a radius and add an ellipse to the path:
struct Pointer: Shape {
    var circleRadius: CGFloat = 3
    func path(in rect: CGRect) -> Path {
        Path { p in
            p.move(to: CGPoint(x: rect.midX, y: rect.minY))
            p.addLine(to: CGPoint(x: rect.midX, y: rect.midY - circleRadius))
            p.addEllipse(in: CGRect(center: rect.center, radius: circleRadius))

        }
    }
}
16:25 For convenience, we can add a center property on CGRect, as
well as an initializer that takes a center and a radius:
extension CGRect {
    var center: CGPoint {
        CGPoint(x: midX, y: midY)
    }

    init(center: CGPoint, radius: CGFloat) {
        self = CGRect(
            x: center.x - radius,
            y: center.y - radius,
            width: radius * 2,
            height: radius * 2
        )
    }
}
17:08 And then we add the short line on the other side of the circle:
struct Pointer: Shape {
    var circleRadius: CGFloat = 3
    func path(in rect: CGRect) -> Path {
        Path { p in
            p.move(to: CGPoint(x: rect.midX, y: rect.minY))
            p.addLine(to: CGPoint(x: rect.midX, y: rect.midY - circleRadius))
            p.addEllipse(in: CGRect(center: rect.center, radius: circleRadius))
            p.move(to: CGPoint(x: rect.midX, y: rect.midY + circleRadius))
            p.addLine(to: CGPoint(x: rect.midX, y: rect.midY + rect.height / 10))
        }
    }
}
18:38 In the ContentView, we comment out the Text view, which
served as the display of the digital clock, and we replace it with a Clock
view. And we pass the stopwatch's total time to the Clock:
struct ContentView: View {
    @ObservedObject var stopwatch = StopwatchModel()

    var body: some View {
        VStack {
            Clock(time: stopwatch.total)
            //Text(stopwatch.total.formatted)
            //    .font(Font.system(size: 64, weight: .thin).monospacedDigit())
            // ...
        }
    }
}
19:45 Adding a blue hand for the current lap time is pretty easy now.
We add an optional lap time property to the Clock, and if it's not nil, we
include a second Pointer in the ZStack:
struct Clock: View {
    var time: TimeInterval = 10
    var lapTime: TimeInterval?

    // ...

    var body: some View {
        ZStack {
            ForEach(0..<60*4) { tick in
                self.tick(at: tick)
            }
            if lapTime != nil {
                Pointer()
                    .stroke(Color.blue, lineWidth: 2)
                    .rotationEffect(Angle.degrees(Double(lapTime!) * 360/60))
            }
            Pointer()
                .stroke(Color.orange, lineWidth: 2)
                .rotationEffect(Angle.degrees(Double(time) * 360/60))
            Color.clear
        }
    }
}
21:06 To make the blue pointer show up, we pass the stopwatch's last
lap time to the Clock:
struct ContentView: View {
    @ObservedObject var stopwatch = StopwatchModel()

    var body: some View {
        VStack {
            Clock(time: stopwatch.total, lapTime: stopwatch.laps.last?.0)
            //Text(stopwatch.total.formatted)
            //    .font(Font.system(size: 64, weight: .thin).monospacedDigit())
            // ...
        }
    }
}

21:48 In the next episode, we'll add labels for the second marks at 5, 10, 15, etc. And we can add two features that are also included in the iOS stopwatch: a small digital clock inside the analog one, and a mini clock that shows minutes.
Written in Swift 5
Become a subscriber to download episode videos.
7 Episodes · 2h34min
Episode 499 · Jul 10
Episode 498 · Jul 03
Episode 497 · Jun 26
Episode 496 · Jun 19
Episode 495 · Jun 12
Episode 494 · Jun 05
Episode 493 · May 29
Episode 492 · May 15
Unlock Full Access
A new episode every week
Take Swift Talk with you when you're offline
With your help we can keep producing new episodes