
7 Episodes · 2h54min
- Setting Up a Document-Based App 25:12
- Markdown Syntax Highlighting 26:27
- Executing Swift Code 23:11
- String Handling 29:47
- Swift Syntax Highlighting 29:41
- Building a Link Checker 19:17
- Improving Performance 21:15
Swift Talk # 145
Subscribers get exclusive access to new and all previous subscriber-only episodes, video downloads, and 30% discount for team members. Become a Subscriber →
We start building our Markdown Playgrounds app from a plain command-line app package, leveraging AppKit's document architecture.
00:06 We're starting a new project today: we're going to build a small Mac app — not using the new Marzipan, but instead making use of good old AppKit.
00:19 We write our books in Markdown documents, and we have tooling in place that extracts, compiles, and runs the Swift code snippets. But this process can be a bit clunky, especially when we have to make updates to the book.
01:06 Then we found out about Org mode, an outlining tool for Emacs that can perform a wide range of tasks. Org mode lets us write code snippets the same way we do in Markdown, and a complicated shortcut can execute one of those snippets by pasting the code into a REPL. And when we run another snippet, it gets added to the same REPL, so each snippet can build on top of the previous ones.
01:45 It's like working in an inverse playground: instead of putting Markdown comments in a Swift file, we write a Markdown document and insert code blocks into it. And that's basically what we want to build as a Mac app: a Markdown editor that can run code blocks by pasting them into the REPL.
02:15 In the end, our app will look like this:
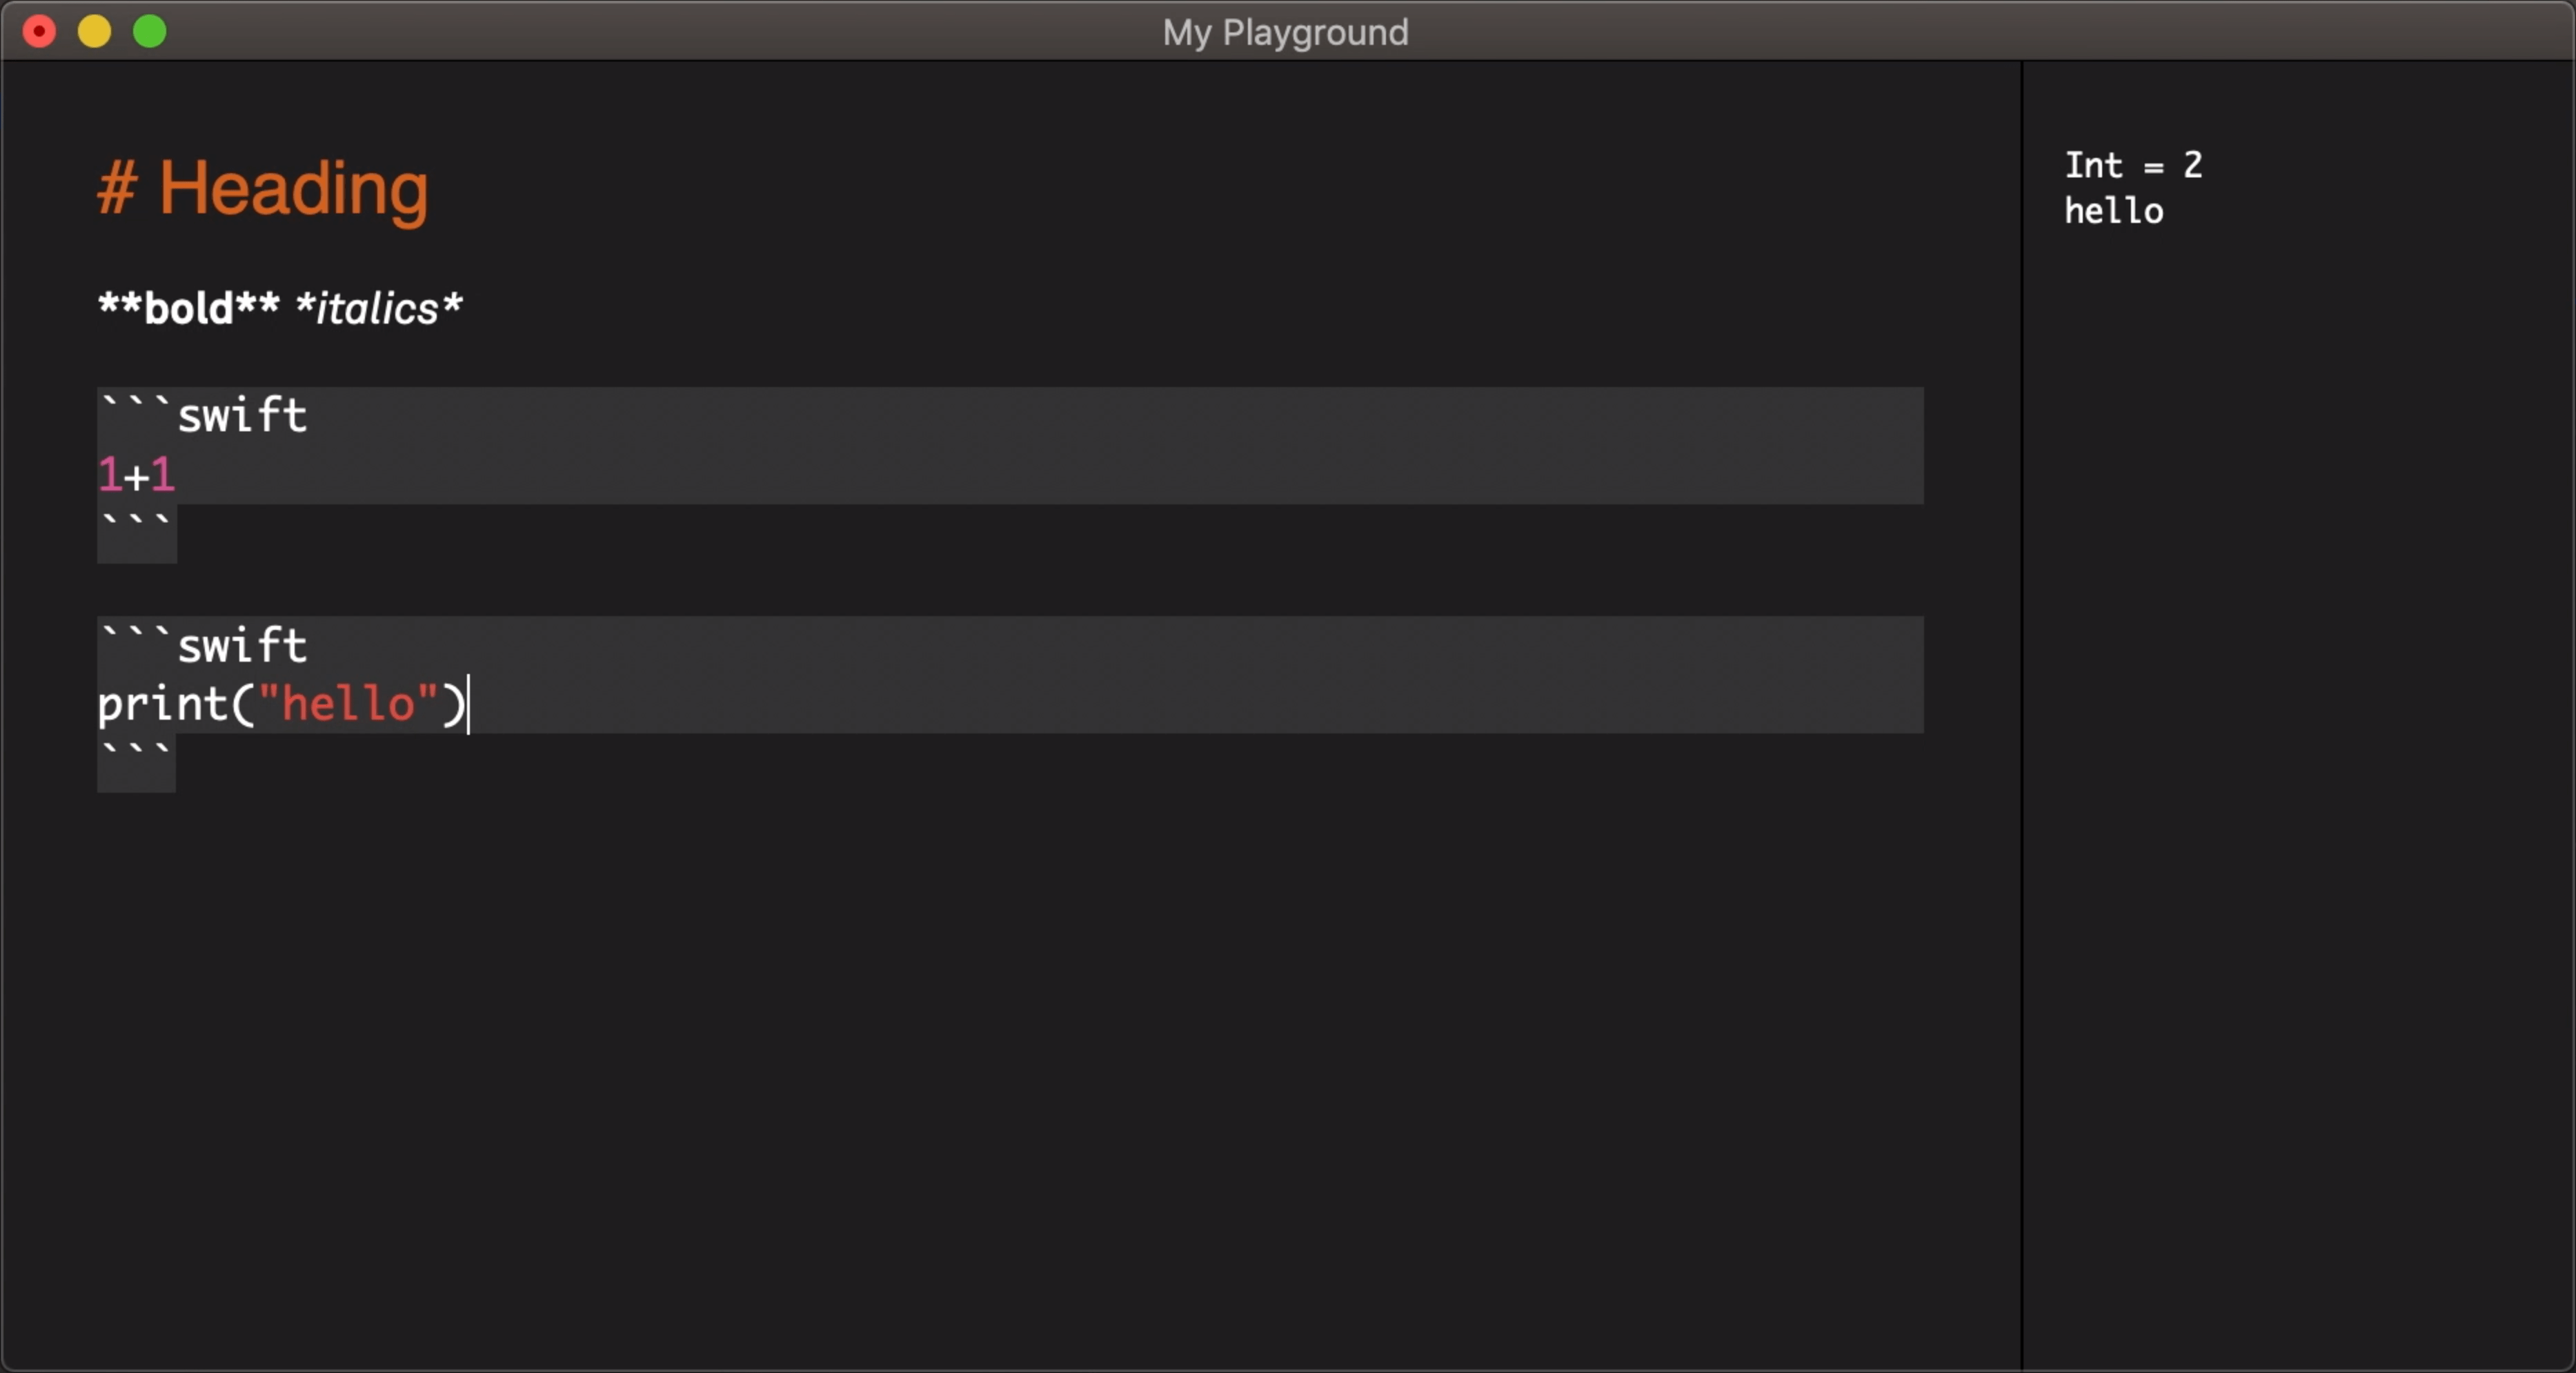
02:22 In the left-hand side text view, we can write text, including headings, bold or italic phrases, and code blocks. When we hit Command+E inside one of the code blocks, it gets run and the output is shown in the sidebar to the right. The app also lets us run a command to execute all code blocks or one to reset the REPL.
03:22 If we look at a slightly larger document, like the Strings chapter from Advanced Swift, we see that it's exactly the same structure, only longer. We haven't yet updated the code to Swift 5 in this version, so when we run all code blocks, many errors are output in the sidebar, and each time an error occurs, the corresponding code block is selected in our source text.
04:07 It's been really useful to see how the code compiles as we write, so that's why we wanted to share this project. And building this application is a fun, small project in which we can go a long way with very little code, because AppKit can do a lot for us.
04:26 However, we won't start out in a typical way in Xcode. Instead, we'll begin with a command-line tool generated by the Swift Package Manager. This allows us to use various packages — like CommonMark for parsing Markdown, and SwiftSyntax for parsing and highlighting Swift code. In the future, when the Swift Package Manager will be integrated into Xcode, setting up a project like this will be much easier.
05:06 We've hidden away some boilerplate code that sets up the
application, and as a result, our main.swift file can stay pretty clean:
import CommonMark
import AppKit

class AppDelegate: NSObject, NSApplicationDelegate {
    func applicationWillFinishLaunching(_ notification: Notification) {
    }
}

let delegate = AppDelegate()
let app = application(delegate: delegate)
app.run()
05:18 The application helper function simply sets up the app with a
main menu and an icon:
func application(delegate: AppDelegate) -> NSApplication {
    // Inspired by https://www.cocoawithlove.com/2010/09/minimalist-cocoa-programming.html
    let app = NSApplication.shared
    NSApp.setActivationPolicy(.regular)
    app.mainMenu = app.customMenu
    app.delegate = delegate
    app.applicationIconImage = NSImage.appIcon
    return app
}
05:28 Since this application is just an executable without resources, the app icon has to be created in code, which is what Matt Gallagher did for us when we asked him for a code review:
06:02 In the app delegate, we have some more setting up to do. We want a
document-based app, for which we need an NSDocument subclass:
class MarkdownDocument: NSDocument {

}
06:27 In a normal AppKit app, the Info.plist file has entries that
specify which kind of documents the app supports, which class names belong to
which document types, etc. But since we don't have an Info.plist, we need to
create an NSDocumentController to provide all that information.
06:57 Our document controller needs to return an array of strings
holding the names of the NSDocument subclasses that we'll work with — just one
in our case:
class MarkdownDocumentController: NSDocumentController {
    override var documentClassNames: [String] {
        return ["MarkdownDocument"]
    }
}
07:32 We also have to tell the Objective-C runtime which name to use for our document class:
@objc(MarkdownDocument)
class MarkdownDocument: NSDocument {}
08:04 We finish setting up the document controller by defining the default document type and returning the document class for a given type name:
class MarkdownDocumentController: NSDocumentController {
    // ...
    override var defaultType: String? {
        return "MarkdownDocument"
    }

    override func documentClass(forType typeName: String) -> AnyClass? {
        return MarkdownDocument.self
    }
}
08:38 In order to assign a shared document controller, we have to simply
instantiate one; according to the documentation, the first ever instantiated
NSDocumentController is picked up by AppKit to become the shared document
controller. We add a comment to explain this, because we might forget and
accidentally remove the line, since it doesn't seem to do anything:
class AppDelegate: NSObject, NSApplicationDelegate {
    func applicationWillFinishLaunching(_ notification: Notification) {
        // First instance becomes the shared document controller
        _ = MarkdownDocumentController()
    }
}
09:56 With the document controller in place, and having defined our document type, we're ready to create a window for a new document.
10:26 We define a new view controller, and we have to remember to
implement its loadView method; otherwise, the app would crash because it
wouldn't be able to find a nib file for the view controller:
final class ViewController: NSViewController {
    override func loadView() {
        self.view = NSView()
    }
}
11:28 Now we can override the document's makeWindowControllers method
to create a window. We give the window a content view controller and a
reasonable size so that it appears on screen. We also have to create a window
controller, pass it the same content view controller as the window, and add the
window controller to the document. Finally, we open the window by calling
makeKeyAndOrderFront:
@objc(MarkdownDocument)
class MarkdownDocument: NSDocument {
    let contentViewController = ViewController()

    override func makeWindowControllers() {
        let window = NSWindow(contentViewController: contentViewController)
        window.setContentSize(NSSize(width: 800, height: 600))
        let wc = NSWindowController(window: window)
        wc.contentViewController = contentViewController
        addWindowController(wc)
        window.makeKeyAndOrderFront(nil)
    }
}
12:38 When we launch the app, an empty window appears. And we can keep creating as many windows as we want by pressing Command+N.
In order to make the windows appear within our recording area, we set the frame autosave name for the window, which tells the system to remember the window's frame and make the window reappear at the same spot it was when we closed it:
@objc(MarkdownDocument)
class MarkdownDocument: NSDocument {
    // ...
    override func makeWindowControllers() {
        // ...
        window.setFrameAutosaveName("windowFrame")
        window.makeKeyAndOrderFront(nil)
    }
}
13:57 In the view controller, we want to have two scrollable text views in a split view. We use a helper we wrote to wrap a text view in a scroll view — the few lines of code in the helper can be checked out in the sample code:
final class ViewController: NSViewController {
    let editor = NSTextView()
    let output = NSTextView()
    override func loadView() {
        let editorSV = editor.configureAndWrapInScrollView(isEditable: true, inset: CGSize(width: 30, height: 10))
        let outputSV = output.configureAndWrapInScrollView(isEditable: false, inset: CGSize(width: 10, height: 10))

    }
}
15:29 We call another helper to skip the boring part of setting up the split view with the two text views:
final class ViewController: NSViewController {
    let editor = NSTextView()
    let output = NSTextView()
    override func loadView() {
        // ...
        self.view = splitView([editorSV, outputSV])
    }
}
15:57 When we run the app, we see both text views in our window, and we can type into the editor view.
We can't undo changes in the editor yet, but this is fixed with one line:
final class ViewController: NSViewController {
    // ...
    override func loadView() {
	      // ...
        editor.allowsUndo = true
        // ...
    }
}
16:30 The split view currently lays out the two subviews with equal widths, but by adding a width constraint to the output view, we can give it a default size, which can be changed by dragging the divider:
final class ViewController: NSViewController {
    // ...
    override func loadView() {
	      // ...
	      outputSV.widthAnchor.constraint(greaterThanOrEqualToConstant: 200).isActive = true
        // ...
    }
}
17:36 Next, we want to be able to save our document and load a document from disk. For both jobs, AppKit will do the heavy lifting for us.
17:59 For loading, we have to tell AppKit which kinds of documents
we're able to read, which we do by implementing the readableTypes class
property:
@objc(MarkdownDocument)
class MarkdownDocument: NSDocument {
    // ...
    override class var readableTypes: [String] {
        return ["public.text"]
    }
    // ...
}
18:41 The type name "public.text" is a higher-level type in the UTI hierarchy, and Markdown is a subtype of it. By using this type, we're saying that we can basically open any text file.
19:00 Then we have to implement read, which we do by simply decoding
the data that AppKit hands to us after reading it from disk. If we're able to
decode a string, we put it in the editor text view:
@objc(MarkdownDocument)
class MarkdownDocument: NSDocument {
    // ...
    override func read(from data: Data, ofType typeName: String) throws {
        guard let str = String(data: data, encoding: .utf8) else { return }
        contentViewController.editor.string = str
    }
    // ...
}
19:51 Assigning the text directly to a subview in the view controller may not be the most elegant solution, but it works for now, and we can always refactor this later.
20:06 Now we're able to run the app and press the key combination Command+O to open a file. We open the Strings chapter from Advanced Swift again, and it shows up correctly in the editor text view.
20:29 To clean up a little, we add an error type that we can throw if we're not able to decode a string from the data that's passed to us:
struct MarkdownError: Error { }

@objc(MarkdownDocument)
class MarkdownDocument: NSDocument {
    // ...
    override func read(from data: Data, ofType typeName: String) throws {
        guard let str = String(data: data, encoding: .utf8) else {
            throw MarkdownError()
        }
        contentViewController.editor.string = str
    }
    // ...
}
21:02 Writing is almost as simple as reading; we just have to implement
the data method that encodes the document's content to Data:
@objc(MarkdownDocument)
class MarkdownDocument: NSDocument {
    // ...
    override func data(ofType typeName: String) throws -> Data {
        return contentViewController.editor.string.data(using: .utf8)!
    }
    // ...
}
21:33 We can safely force-unwrap the result from encoding a string to UTF-8, because strings in Swift use Unicode internally.
22:03 The last thing to implement is the isNativeType method, with
which we tell AppKit that we're able to both read and write our document type:
@objc(MarkdownDocument)
class MarkdownDocument: NSDocument {
    // ...
    override class func isNativeType(_ name: String) -> Bool {
        return true
    }
    // ...
}
22:48 Now we can enter text in our document and then save it, and the title bar will display a file icon and the file name we chose.
23:07 When we continue editing after saving, we want the window to indicate that we have unsaved changes (by greying out the file name and displaying a dot in the close button). We ask the system to do this with one line of code in the method that encodes data for saving:
@objc(MarkdownDocument)
class MarkdownDocument: NSDocument {
    // ...
    override func data(ofType typeName: String) throws -> Data {
        contentViewController.editor.breakUndoCoalescing()
        return contentViewController.editor.string.data(using: .utf8)!
    }
    // ...
}
24:04 Now we see if there are unsaved changes. The system will also ask us if we want to save these changes when we try closing the window.
24:20 Setting up an AppKit project like this is pretty magical, both in a good and a bad way: we get a lot of functionality for free, but there's a lot of runtime programming involved, and we have to read a lot of documentation in order to know which properties and methods to override.
25:00 Now that we have a working editor, we're ready to look into syntax highlighting. Let's pick up there next week.
Written in Swift 5
Open-Source Project
Become a subscriber to download episode videos.
May 18, 2020
A quick way to run SwiftUI from the command line
April 29, 2019
How not to break Emoji and other Unicode characters
7 Episodes · 2h54min
Episode 495 · Jun 12
Episode 494 · Jun 05
Episode 493 · May 29
Episode 492 · May 15
Episode 491 · May 07
Episode 490 · May 01
Episode 489 · Apr 24
Episode 488 · Apr 17
Unlock Full Access
A new episode every week
Take Swift Talk with you when you're offline
With your help we can keep producing new episodes