00:06 We're finally ready to use our layout library! Instead of building
more features, we're going to see how it works in practice.
00:14 In the first episode of this series, we showed a flight info
app. Now
we're going to build something similar to that example. We've prepared some
types, an example flight, a date formatter, and a helper that provides metadata:
struct Airport {
    var city: String
    var code: String
    var time: Date
}

struct Flight {
    var origin: Airport
    var destination: Airport
    var name: String
    var terminal: String
    var gate: String
    var boarding: Date
}

let start: TimeInterval = 3600*7
let flight = Flight(origin: Airport(city: "Berlin", code: "TXL", time:
    Date(timeIntervalSince1970: start)), destination: Airport(city: "Paris", code: "CDG", time: Date(timeIntervalSince1970: start + 2*3600)), name: "AF123", terminal: "1", gate: "14", boarding: Date(timeIntervalSince1970: start - 1800))

let formatter: DateFormatter = {
    let f = DateFormatter()
    f.dateStyle = .none
    f.timeStyle = .short
    return f
}()

extension Flight {
    var metaData: [(String, String)] {
        return [("FLIGHT", name), ("TERMINAL", terminal), ("GATE", gate), ("BOARDING", formatter.string(from: boarding))]
    }
}
00:58 As a first step, we add a layout property on Flight and call it
for the layout that is to be displayed by the view controller:
extension Flight {
    var layout: Layout {
        return .empty
    }
}

class ViewController: UIViewController {
    override func viewDidLoad() {
        super.viewDidLoad()

        let layout = flight.layout

        let container = LayoutContainer(layout)
        container.translatesAutoresizingMaskIntoConstraints = false

        view.addSubview(container)
        view.addConstraints([
            container.topAnchor.constraint(equalTo: view.layoutMarginsGuide.topAnchor),
            container.leadingAnchor.constraint(equalTo: view.layoutMarginsGuide.leadingAnchor),
            container.trailingAnchor.constraint(equalTo: view.layoutMarginsGuide.trailingAnchor),
        ])
    }
}
Showing Origin and Destination
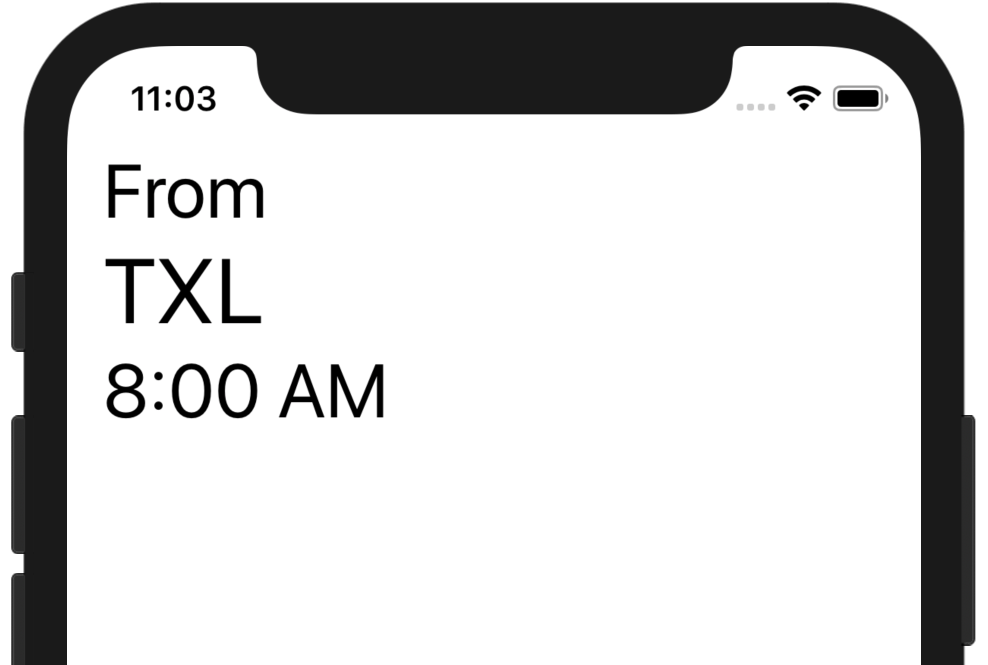
01:21 Next we can create some labels grouped in a vertical layout and
containing the information we want to display. By using a date formatter, we're
already introducing some variation into our layout, since the string returned by
the formatter depends on the user's locale:
extension Flight {
    var layout: Layout {
        let l = UILabel(text: "From", size: .body).layout
        let c = UILabel(text: origin.code, size: .largeTitle).layout
        let t = UILabel(text: formatter.string(from: origin.time), size: .body).layout
        return [l, c, t].vertical()
    }
}
03:24 We can now see information about the origin airport:
03:29 We'll need the same information about the destination airport. We
move the above code into a method on Airport so that we can reuse it for both
airports:
extension Airport {
    func layout(title: String) -> Layout {
        let l = UILabel(text: title, size: .body).layout
        let c = UILabel(text: code, size: .largeTitle).layout
        let t = UILabel(text: formatter.string(from: time), size: .body).layout
        return [l, c, t].vertical()
    }
}

extension Flight {
    var layout: Layout {
        let orig = origin.layout(title: "From")
        let dest = destination.layout(title: "To")
        return [orig, dest].horizontal(space: .flexible(min: 20))
    }
}
04:50 What happens when we put the two layouts next to each other can be
counterintuitive to someone who doesn't know how the library works:
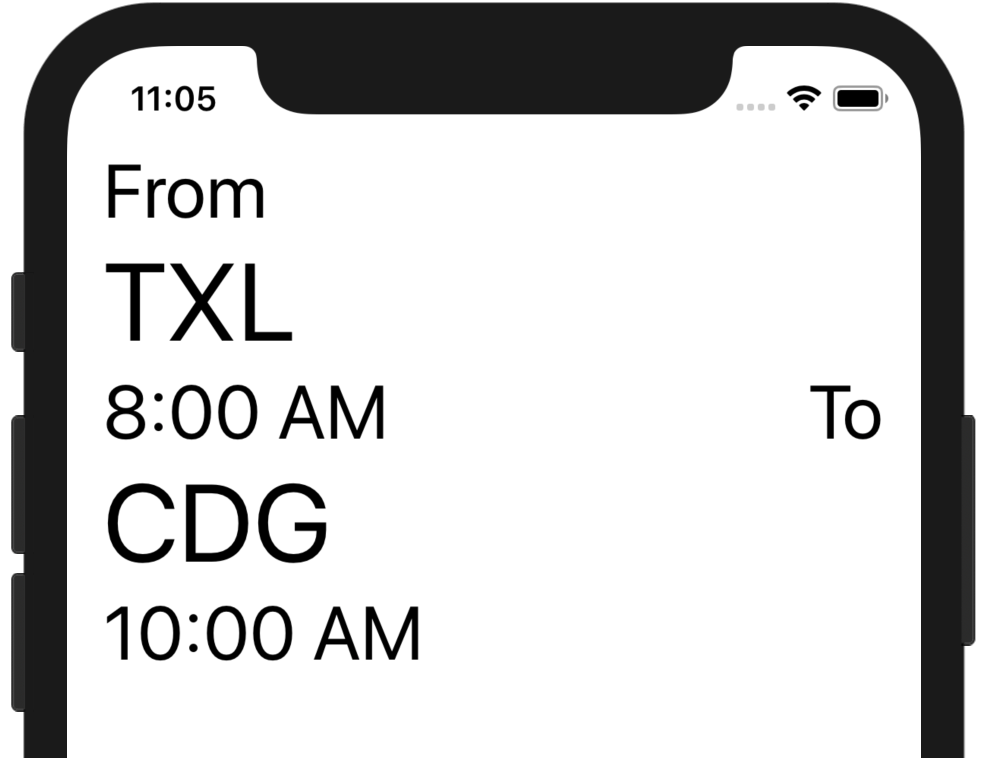
04:59 The layout library is line based, and it concatenates the first
line of the destination airport layout with the last line of the origin airport
layout. That explains why the "To" label is placed next to the "8:00 AM" label.
To fix the layout, we want to wrap each group of labels in a box and have the
two boxes laid out next to each other on a line:
extension Airport {
func layout(title: String) -> Layout {
return [l, c, t].vertical().box()
}
}
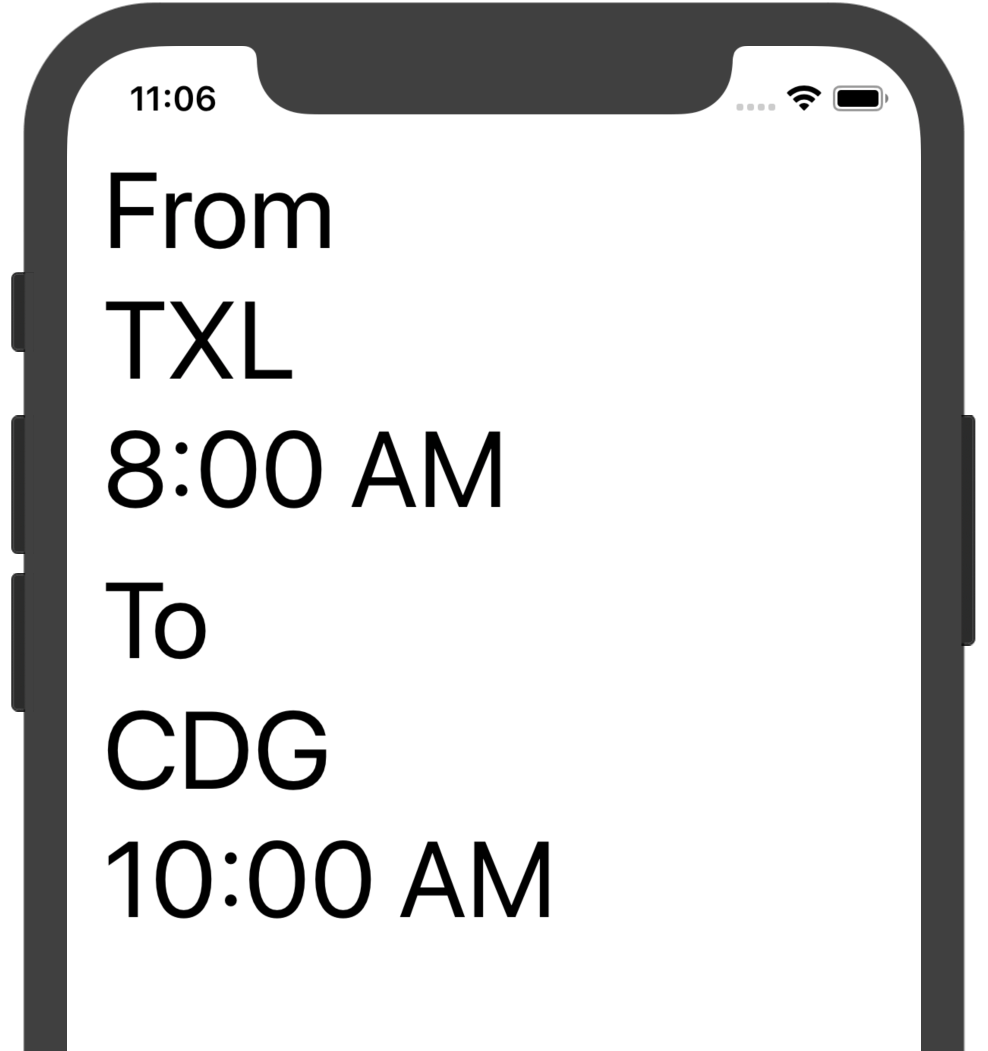
05:40 The two boxes are now placed next to each other, but we
immediately see that they overlap when the font size is too large. We should
provide an alternative layout that stacks the two airports vertically:
extension Flight {
    var layout: Layout {
        let orig = origin.layout(title: "From")
        let dest = destination.layout(title: "To")
        return [orig, dest].horizontal(space: .flexible(min: 20)).or([orig, dest].vertical(space: 10))
    }
}
Now, if there's not enough room to put the two airports next to each other on
the same line, the layout switches to the vertical version:
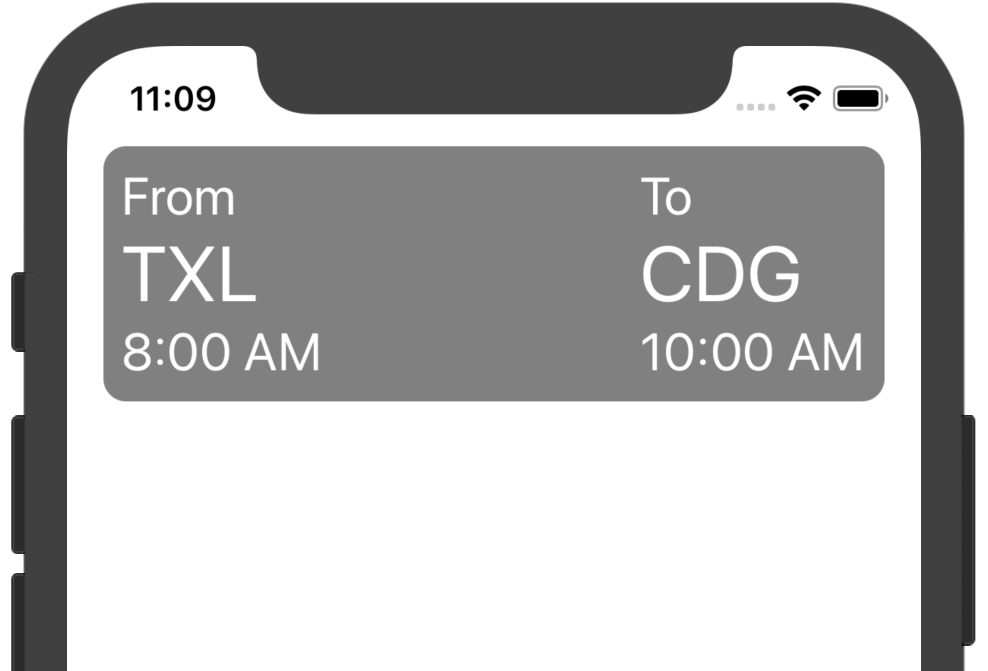
06:58 We wrap the whole thing in a box with a wrapper view with a gray
background. We use a custom convenience initializer to create this wrapper view:
extension Flight {
    var layout: Layout {
        let orig = origin.layout(title: "From")
        let dest = destination.layout(title: "To")
        let flightBg = UIView(backgroundColor: .gray, cornerRadius: 10)
        return [orig, dest].horizontal(space: .flexible(min: 20)).or([orig, dest].vertical(space: 10)).box(wrapper: flightBg, width: .flexible(min: 0))
    }
}
We give the box a flexible width so that it stretches out to the entire width of
the screen — we'd ideally like to express that the minimum width is based on the
box's contents, but we can't do that currently, so we define the minimum width
as zero.
08:07 We also change the text color of the labels to white, in order to
make them look better on the gray background:
extension Airport {
    func layout(title: String) -> Layout {
        let l = UILabel(text: title, size: .body, textColor: .white).layout
        let c = UILabel(text: code, size: .largeTitle, textColor: .white).layout
        let t = UILabel(text: formatter.string(from: time), size: .body, textColor: .white).layout
        return [l, c, t].vertical().box()
    }
}
Adding Metadata Labels
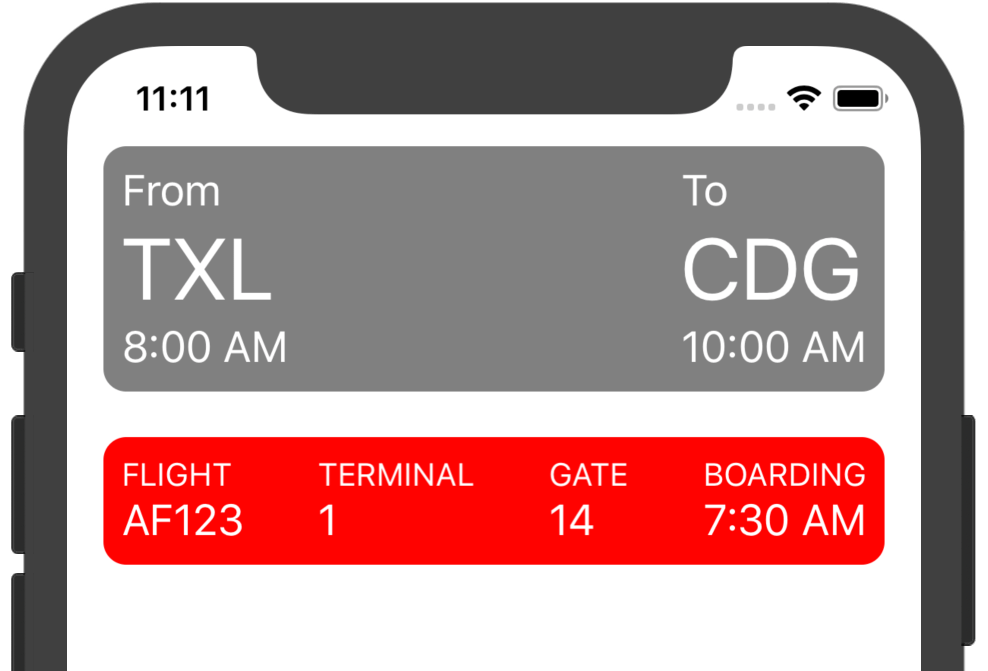
08:47 Next, we add the metadata to the layout by mapping over the array
of key-value pairs, wrapping each label pair in a box and combining the boxes
horizontally. We wrap the entire metadata combination in a box with a red
background color:
extension Flight {
var layout: Layout {
let flight = let metaItems = metaData.map { (key, value) in
[
UILabel(text: key, size: .caption1, textColor: .white).layout,
UILabel(text: value, size: .body, textColor: .white).layout
].vertical(space: 0).box()
}
let meta = metaItems.horizontal(space: .flexible(min: 20)).box(wrapper: UIView(backgroundColor: .red, cornerRadius: 10), width: .flexible(min: 0))
return [flight, meta].vertical(space: 20)
}
}
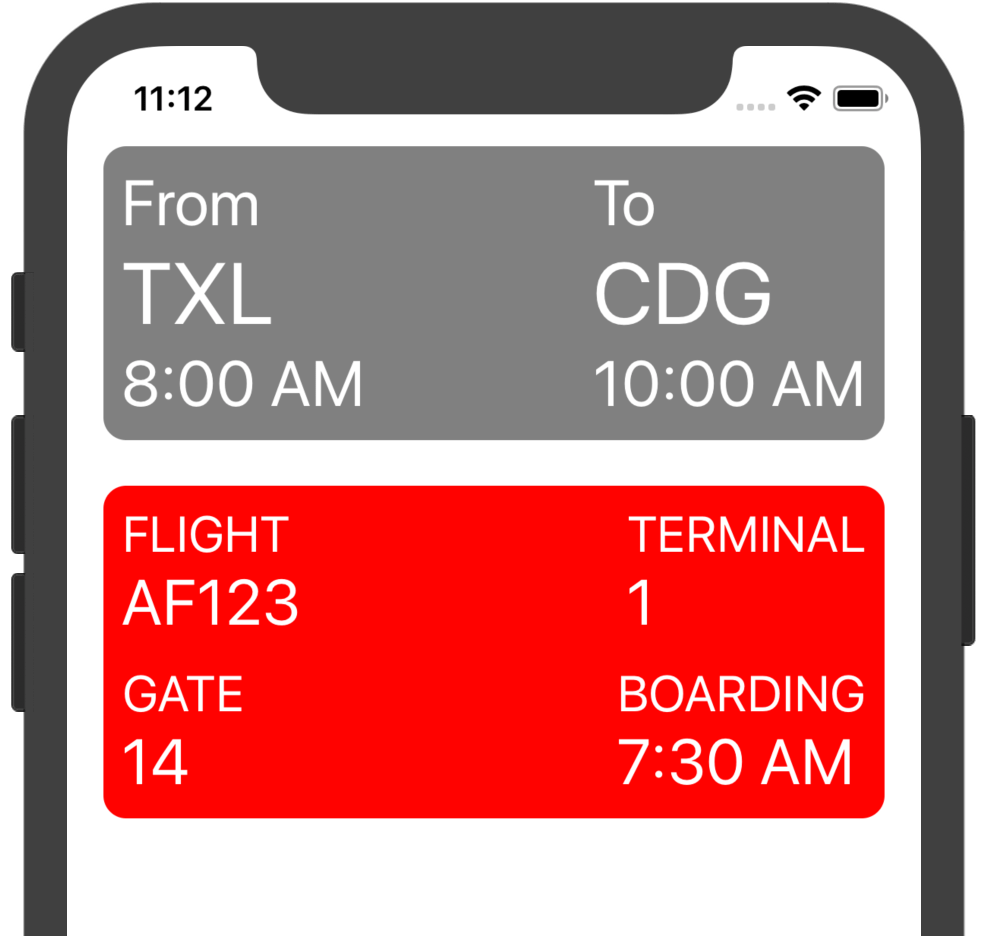
Adding Variations
11:50 This looks good, but when we increase the font size using the
Accessibility Inspector, the labels quickly start to overlap, so let's provide
some alternative layouts. If the four boxes don't fit next to each other on one
line, we want to switch to a grid of two by two:
extension Flight {
var layout: Layout {
let meta = metaItems.horizontal(space: .flexible(min: 20)).or(
[
metaItems[0...1].horizontal(space: .flexible(min: 20)),
metaItems[2...3].horizontal(space: .flexible(min: 20))
].vertical(space: 10)
)
let metaLayout = meta.box(wrapper: UIView(backgroundColor: .red, cornerRadius: 10), width: .flexible(min: 0))
return [flight, metaLayout].vertical(space: 20)
}
}
13:43 This almost works, but we've defined the horizontal and vertical
helpers on Array, and by using a range subscript on metaItems, we end up
with an ArraySlice instead. Looking at the helpers, we see that we use methods
like dropLast and reversed, so we need to work with a type that can be
reversed efficiently. We change the type to BidirectionalCollection:
extension BidirectionalCollection where Element == Layout {
    func horizontal(space: Width? = nil) -> Layout {
        guard var result = last else { return .empty }
        for l in dropLast().reversed() {
            if let width = space {
                result = .space(width, result)
            }
            result = l + result
        }
        return result
    }

    func vertical(space: CGFloat = 0) -> Layout {
        guard var result = last else { return .empty }
        for l in dropLast().reversed() {
            result = l + .newline(space: space, result)
        }
        return result
    }
}
14:19 Everything else still works because BidirectionalCollection has
the same API as Array. We run the app and check that it works:
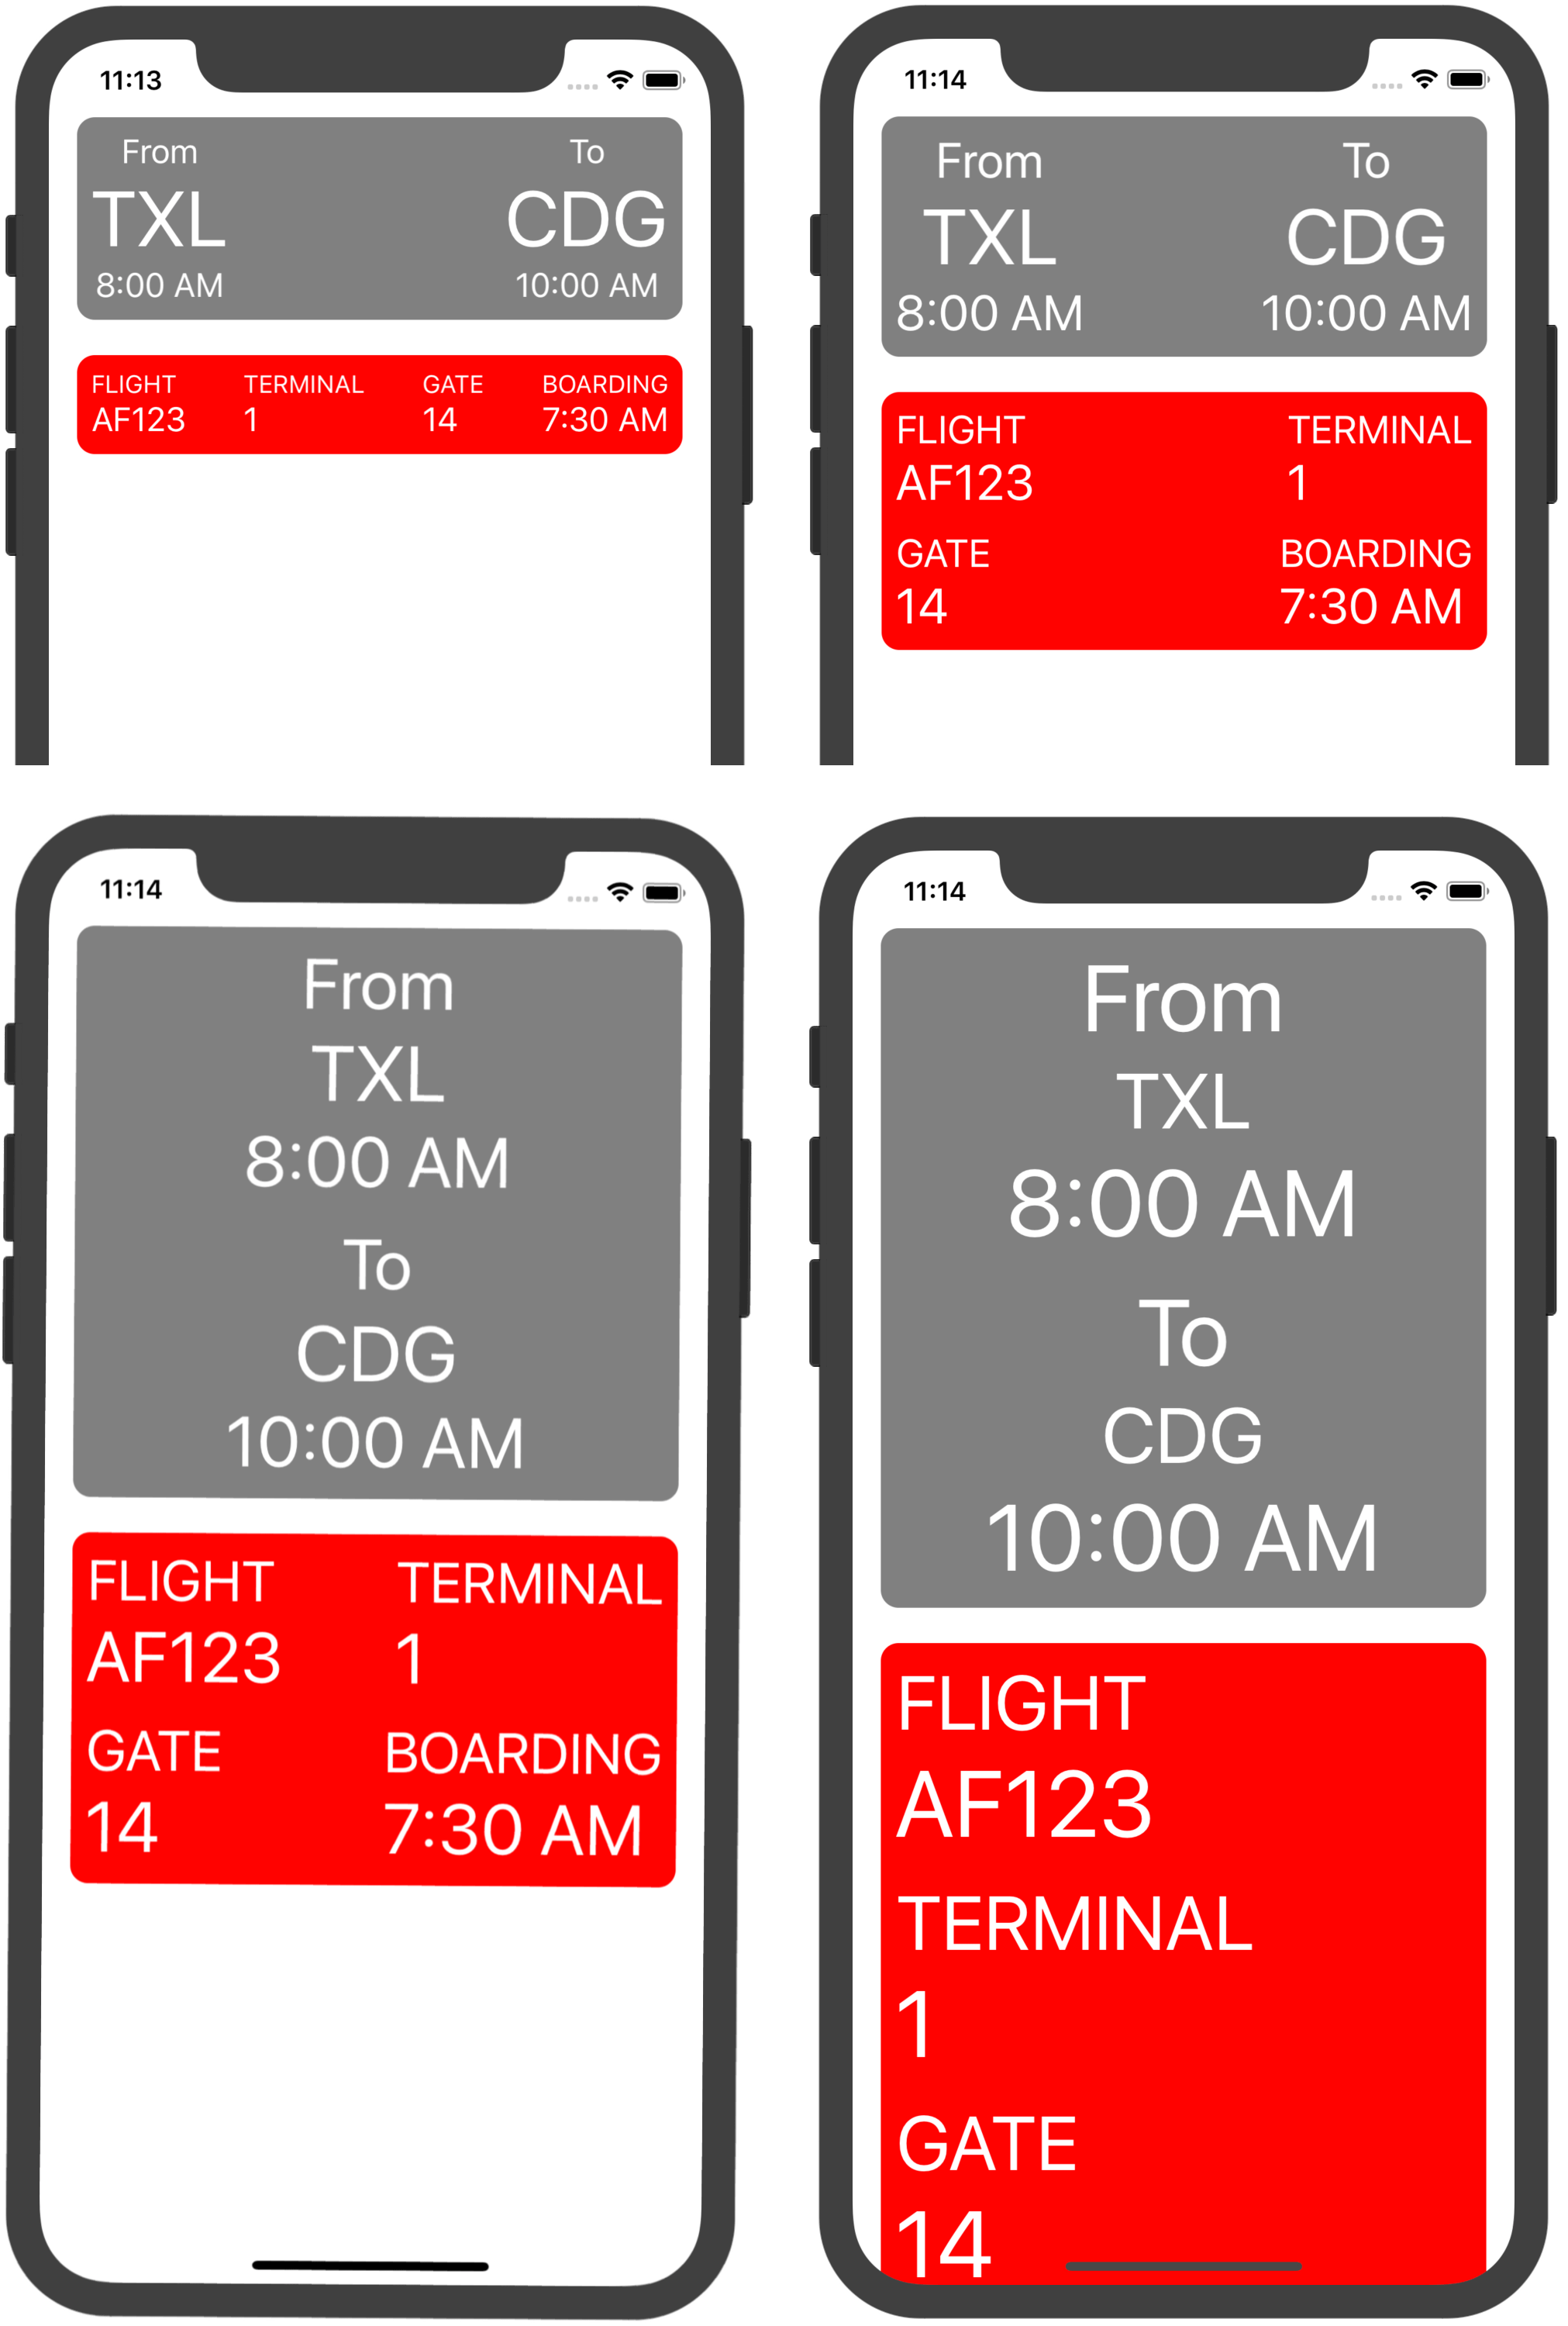
14:37 Increasing the font size even more, we want to switch to a third
variation where each of the four metadata boxes is on its own line:
extension Flight {
var layout: Layout {
let meta = metaItems.horizontal(space: .flexible(min: 20)).or(
[
metaItems[0...1].horizontal(space: .flexible(min: 20)),
metaItems[2...3].horizontal(space: .flexible(min: 20))
].vertical(space: 10)
).or(metaItems.vertical(space: 10))
}
}
Centering Horizontally
15:36 It would be nice to center the airport information labels. We
would use text alignment for this if we could stretch out the labels to fill the
width of their containers. Unfortunately, we can't do that, because we can't
define a custom width for views.
16:07 However, we can achieve the same effect by adding a flexible space
before and after the labels, because each label is on a separate line inside the
box. We add a helper, centered, to horizontally join together a flexible
space, a layout element, and another flexible space:
extension Layout {
    var centered: Layout {
        return [.space(.flexible(min: 0), .empty), self, .space(.flexible(min: 0), .empty)].horizontal()
    }
}
Then we call this helper to center the three airport labels:
extension Airport {
    func layout(title: String) -> Layout {
        let l = UILabel(text: title, size: .body, textColor: .white).layout.centered
        let c = UILabel(text: code, size: .largeTitle, textColor: .white).layout.centered
        let t = UILabel(text: formatter.string(from: time), size: .body, textColor: .white).layout.centered
        return [l, c, t].vertical().box()
    }
}
18:08 The labels are now centered inside their box. However, when the
font size is large enough that the airports get laid out vertically, then the
two boxes should also be centered inside their surrounding box. To achieve this,
we use the centered helper on both airport elements in the vertical choice:
extension Flight {
var layout: Layout {
let orig = origin.layout(title: "From")
let dest = destination.layout(title: "To")
let flightBg = UIView(backgroundColor: .gray, cornerRadius: 10)
let flight = [orig, dest].horizontal(space: .flexible(min: 20)).or([orig.centered, dest.centered].vertical(space: 10)).box(wrapper: flightBg, width: .flexible(min: 0))
return [flight, metaLayout].vertical(space: 20)
}
}
Conclusion
19:36 In this short amount of time and using a fairly small amount of
code, we've made our app work for a whole range of font sizes, device
orientations, and locales. It would take a lot of work to build the same
responsive layout using just Auto Layout constraints. If anyone wants to take up
this challenge, we'd be very interested in seeing that implementation!
19:49 There are still many more features we could add to the library.
For example, we could automatically use a scroll view if the layout doesn't fit
on the screen vertically. It would also be nice to have the option to vertically
align elements on a single line, so that we could put an airplane icon in the
middle between the origin and destination.
20:09 The possibilities are endless, but the library is already very
useful right now. We really like the idea that we only have to define a few
layout variations and that the library figures out which one to apply for us.
